if (executor == null) { //如果线程池为空,则创建一个线程池, //这个线程池非常的特殊,他为每个任务都单独创建一个任务 executor = new ThreadPerTaskExecutor(newDefaultThreadFactory()); }
//这个children实际上是一个NioEventLoop数组 children = new EventExecutor[nThreads];
for (int i = 0; i < nThreads; i ++) { boolean success = false; //用于标记是否创建成功 try { //这里的newChild实际是子类NioEventLoopGroup实现的 children[i] = newChild(executor, args); success = true; } catch (Exception e) { // TODO: Think about if this is a good exception type thrownew IllegalStateException("failed to create a child event loop", e); } finally { if (!success) { //如果在创建的NioEventLoop数组数组中途出现了异常 //那么就将成功创建的NioEventLoop关闭掉 for (int j = 0; j < i; j ++) { children[j].shutdownGracefully(); }
for (int j = 0; j < i; j ++) { EventExecutor e = children[j]; try { while (!e.isTerminated()) { e.awaitTermination(Integer.MAX_VALUE, TimeUnit.SECONDS); } } catch (InterruptedException interrupted) { // Let the caller handle the interruption. Thread.currentThread().interrupt(); break; } } } } }
private ChannelFuture doBind(final SocketAddress localAddress){ //对Channel进行初始化和注册操作 final ChannelFuture regFuture = initAndRegister(); final Channel channel = regFuture.channel(); if (regFuture.cause() != null) { return regFuture; }
if (regFuture.isDone()) { // At this point we know that the registration was complete and successful. ChannelPromise promise = channel.newPromise(); doBind0(regFuture, channel, localAddress, promise); return promise; } else { // Registration future is almost always fulfilled already, but just in case it's not. final PendingRegistrationPromise promise = new PendingRegistrationPromise(channel); regFuture.addListener(new ChannelFutureListener() { @Override publicvoidoperationComplete(ChannelFuture future)throws Exception { Throwable cause = future.cause(); if (cause != null) { // Registration on the EventLoop failed so fail the ChannelPromise directly to not cause an // IllegalStateException once we try to access the EventLoop of the Channel. promise.setFailure(cause); } else { // Registration was successful, so set the correct executor to use. // See https://github.com/netty/netty/issues/2586 promise.registered();
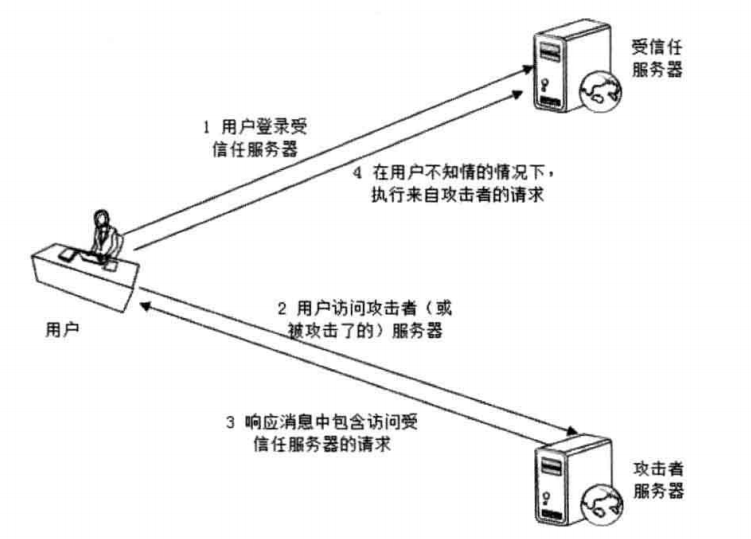
CSRF(cross site request frogery,跨站点请求伪造),攻击者通过跨站请求,以合法用户的身份进行非常操作,如转账交易、发表评论等。CSRF的主要手段是利用跨站请求,在用户不支持的情况下,以用户的身份伪造请求。核心是利用了浏览器Cookie或服务器Session策略,盗取用户身份。
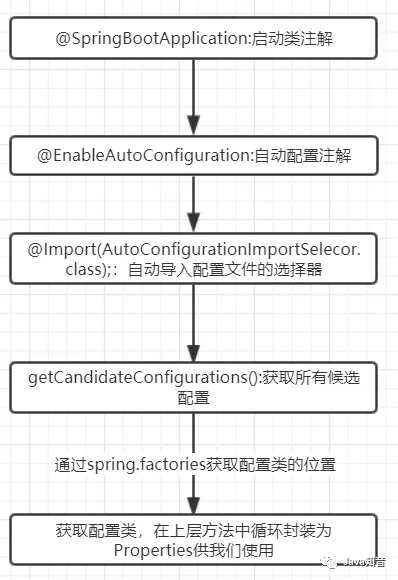
protected List<String> getCandidateConfigurations(AnnotationMetadata metadata, AnnotationAttributes attributes){ List<String> configurations = SpringFactoriesLoader.loadFactoryNames(getSpringFactoriesLoaderFactoryClass(), getBeanClassLoader()); Assert.notEmpty(configurations, "No auto configuration classes found in META-INF/spring.factories. If you " + "are using a custom packaging, make sure that file is correct."); return configurations; }
protected HandlerAdapter getHandlerAdapter(Object handler)throws ServletException { for (HandlerAdapter ha : this.handlerAdapters) { if (logger.isTraceEnabled()) { logger.trace("Testing handler adapter [" + ha + "]"); } if (ha.supports(handler)) { return ha; } } thrownew ServletException("No adapter for handler [" + handler + "]: The DispatcherServlet configuration needs to include a HandlerAdapter that supports this handler"); }
publicstaticvoidbyteBufComposite(){ // 复合缓冲区,只是提供一个视图 CompositeByteBuf messageBuf = Unpooled.compositeBuffer(); ByteBuf headerBuf = Unpooled.buffer(); // can be backing or direct ByteBuf bodyBuf = Unpooled.directBuffer(); // can be backing or direct messageBuf.addComponents(headerBuf, bodyBuf); messageBuf.removeComponent(0); // remove the header for (ByteBuf buf : messageBuf) { System.out.println(buf.toString()); } }
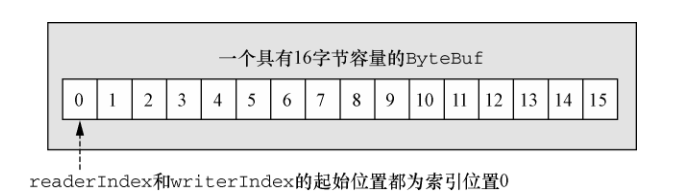
字节级操作
随机访问索引
和普通的Java数组一样,ByteBuf的索引也是从零开始的。
1 2 3 4 5
ByteBuf buffer = ...; for (int i = 0; i < buffer.capacity(); i++) { byte b = buffer.getByte(i); System.out.println((char)b); }
protectedvoidrun(){ for (;;) { try { try { //通过hasTasks方法判断队列中是否还有未处理的方法 switch (selectStrategy.calculateStrategy(selectNowSupplier, hasTasks())) { case SelectStrategy.CONTINUE: continue;
case SelectStrategy.BUSY_WAIT: // fall-through to SELECT since the busy-wait is not supported with NIO //没有任务则执行,select()执行网络IO case SelectStrategy.SELECT: select(wakenUp.getAndSet(false)); if (wakenUp.get()) { selector.wakeup(); } // fall through default: } } catch (IOException e) { //如果本轮Selector的轮询结果为null,那么可能触发了jdk epoll的bug //该bug会导致IO线程处于100%的状态,需要重建Selector来解决 rebuildSelector0(); handleLoopException(e); continue; }
privatevoidrebuildSelector0(){ final Selector oldSelector = selector; final SelectorTuple newSelectorTuple;
if (oldSelector == null) { return; }
try { //创建一个新的Selector newSelectorTuple = openSelector(); } catch (Exception e) { logger.warn("Failed to create a new Selector.", e); return; }
// Register all channels to the new Selector. int nChannels = 0; for (SelectionKey key: oldSelector.keys()) { //将原Selector上注册的所有SelectionKey转移到新的Selector Object a = key.attachment(); try { if (!key.isValid() || key.channel().keyFor(newSelectorTuple.unwrappedSelector) != null) { continue; }
int interestOps = key.interestOps(); key.cancel(); SelectionKey newKey = key.channel().register(newSelectorTuple.unwrappedSelector, interestOps, a); if (a instanceof AbstractNioChannel) { // Update SelectionKey ((AbstractNioChannel) a).selectionKey = newKey; } nChannels ++; } catch (Exception e) { logger.warn("Failed to re-register a Channel to the new Selector.", e); if (a instanceof AbstractNioChannel) { AbstractNioChannel ch = (AbstractNioChannel) a; ch.unsafe().close(ch.unsafe().voidPromise()); } else { @SuppressWarnings("unchecked") NioTask<SelectableChannel> task = (NioTask<SelectableChannel>) a; invokeChannelUnregistered(task, key, e); } } }
try { // time to close the old selector as everything else is registered to the new one //关闭旧的Selector oldSelector.close(); } catch (Throwable t) { if (logger.isWarnEnabled()) { logger.warn("Failed to close the old Selector.", t); } }
if (logger.isInfoEnabled()) { logger.info("Migrated " + nChannels + " channel(s) to the new Selector."); } }
privatevoidprocessSelectedKey(SelectionKey k, AbstractNioChannel ch){ final AbstractNioChannel.NioUnsafe unsafe = ch.unsafe();
// 省略代码 ......
try { int readyOps = k.readyOps(); // We first need to call finishConnect() before try to trigger a read(...) or write(...) as otherwise // the NIO JDK channel implementation may throw a NotYetConnectedException. if ((readyOps & SelectionKey.OP_CONNECT) != 0) { // remove OP_CONNECT as otherwise Selector.select(..) will always return without blocking // See https://github.com/netty/netty/issues/924 int ops = k.interestOps(); ops &= ~SelectionKey.OP_CONNECT; k.interestOps(ops);
unsafe.finishConnect(); }
if ((readyOps & SelectionKey.OP_WRITE) != 0) { // Call forceFlush which will also take care of clear the OP_WRITE once there is nothing left to write ch.unsafe().forceFlush(); }
基于加权轮询算法的RoundRobinLoadBalance 基于加权的轮询算法会根据每台服务器的性能为服务器设置一个权值,加权后,每台服务器能够得到的请求数比例,接近或等于他们的权重比。比如服务器 A、B、C 权重比为 5:2:1。那么在8次请求中,服务器 A 将收到其中的5次请求,服务器 B 会收到其中的2次请求,服务器 C 则收到其中的1次请求。
<selectid="findActiveBlogWithTitleLike" resultType="Blog"> SELECT * FROM BLOG WHERE state = ‘ACTIVE’ <iftest="title != null"> AND title like #{title} </if> </select>
choose, when, otherwise
1 2 3 4 5 6 7 8 9 10 11 12 13 14 15
<selectid="findActiveBlogLike" resultType="Blog"> SELECT * FROM BLOG WHERE state = ‘ACTIVE’ <choose> <whentest="title != null"> AND title like #{title} </when> <whentest="author != null and author.name != null"> AND author_name like #{author.name} </when> <otherwise> AND featured = 1 </otherwise> </choose> </select>
<selectid="findActiveBlogLike" resultType="Blog"> SELECT * FROM BLOG <where> <iftest="state != null"> state = #{state} </if> <iftest="title != null"> AND title like #{title} </if> <iftest="author != null and author.name != null"> AND author_name like #{author.name} </if> </where> </select>
<selectid="selectPostIn"resultType="domain.blog.Post"> SELECT * FROM POST P WHERE ID in <foreachitem="item"index="index"collection="list" open="("separator=","close=")"> #{item} </foreach> </select>
publicclassMockClusterInvoker<T> implementsInvoker<T> { privatefinal Invoker<T> invoker; public Result invoke(Invocation invocation)throws RpcException { Result result = null;
// 从消息头中获取消息体长度 int len = Bytes.bytes2int(header, 12); // 检测消息体长度是否超出限制,超出则抛出异常 checkPayload(channel, len);
int tt = len + HEADER_LENGTH; // 检测可读的字节数是否小于实际的字节数 if (readable < tt) { return DecodeResult.NEED_MORE_INPUT; } ChannelBufferInputStream is = new ChannelBufferInputStream(buffer, len);
/** Wrapper0 是在运行时生成的,大家可使用 Arthas 进行反编译 */ public class Wrapper0 extends Wrapper implements ClassGenerator.DC { public static String[] pns; public static Map pts; public static String[] mns; public static String[] dmns; public static Class[] mts0;
// 省略其他方法
public Object invokeMethod(Object object, String string, Class[] arrclass, Object[] arrobject) throws InvocationTargetException { DemoService demoService; try { // 类型转换 demoService = (DemoService)object; } catch (Throwable throwable) { throw new IllegalArgumentException(throwable); } try { // 根据方法名调用指定的方法 if ("sayHello".equals(string) && arrclass.length == 1) { return demoService.sayHello((String)arrobject[0]); } } catch (Throwable throwable) { throw new InvocationTargetException(throwable); } throw new NoSuchMethodException(new StringBuffer().append("Not found method \"").append(string).append("\" in class com.alibaba.dubbo.demo.DemoService.").toString()); } }
// Destroy already created singletons to avoid dangling resources. destroyBeans();
// Reset 'active' flag. cancelRefresh(ex);
// Propagate exception to caller. throw ex; }
finally { // Reset common introspection caches in Spring's core, since we // might not ever need metadata for singleton beans anymore... resetCommonCaches(); } } }
// Invoke BeanDefinitionRegistryPostProcessors first, if any. Set<String> processedBeans = new HashSet<>();
if (beanFactory instanceof BeanDefinitionRegistry) { BeanDefinitionRegistry registry = (BeanDefinitionRegistry) beanFactory; List<BeanFactoryPostProcessor> regularPostProcessors = new ArrayList<>(); List<BeanDefinitionRegistryPostProcessor> registryProcessors = new ArrayList<>();
// 记录是否是定义类的 Processor 或者普通的 Processor
// Do not initialize FactoryBeans here: We need to leave all regular beans // uninitialized to let the bean factory post-processors apply to them! // Separate between BeanDefinitionRegistryPostProcessors that implement // PriorityOrdered, Ordered, and the rest. List<BeanDefinitionRegistryPostProcessor> currentRegistryProcessors = new ArrayList<>();
// 从注册表中的配置类派生更多的bean定义 publicvoidpostProcessBeanDefinitionRegistry(BeanDefinitionRegistry registry){ // ... this.registriesPostProcessed.add(registryId); // Build and validate a configuration model based on the registry of Configuration classes. processConfigBeanDefinitions(registry); }
// Return immediately if no @Configuration classes were found if (configCandidates.isEmpty()) { return; }
// 按照 Ordered 对配置进行排序
// 加载自定义 bean 名命策略
if (this.environment == null) { this.environment = new StandardEnvironment(); }
// Parse each @Configuration class ConfigurationClassParser parser = new ConfigurationClassParser( this.metadataReaderFactory, this.problemReporter, this.environment, this.resourceLoader, this.componentScanBeanNameGenerator, registry);
Set<BeanDefinitionHolder> candidates = new LinkedHashSet<>(configCandidates); Set<ConfigurationClass> alreadyParsed = new HashSet<>(configCandidates.size()); do { // 解译候选集 parser.parse(candidates); parser.validate();
Set<ConfigurationClass> configClasses = new LinkedHashSet<>(parser.getConfigurationClasses()); configClasses.removeAll(alreadyParsed);
// Read the model and create bean definitions based on its content this.reader.loadBeanDefinitions(configClasses); alreadyParsed.addAll(configClasses);
// ... } while (!candidates.isEmpty());
// Register the ImportRegistry as a bean in order to support ImportAware @Configuration classes if (sbr != null && !sbr.containsSingleton(IMPORT_REGISTRY_BEAN_NAME)) { sbr.registerSingleton(IMPORT_REGISTRY_BEAN_NAME, parser.getImportRegistry()); }
if (this.metadataReaderFactory instanceof CachingMetadataReaderFactory) { // Clear cache in externally provided MetadataReaderFactory; this is a no-op // for a shared cache since it'll be cleared by the ApplicationContext. ((CachingMetadataReaderFactory) this.metadataReaderFactory).clearCache(); } }