Introduction
As you know, I have been fortunate enough to be selected by my instructors to participate in the provincial cloud computing competition. As a result, I have joined the project group in campus.
As a member of the group, I need to study hard and continuously expand my knowledge. To achieve good results at the upcoming provincial competition, we need to learn about the structure of private clouds and the different types of container clouds.
One suggested option for a private cloud solution is OpenStack, which can be complex and require significant effort to master.
However, I am still motivated to pursue this technology as I have a strong interest in IT and Linux-related topics, and I believe that the challenge of learning OpenStack will ultimately improve my knowledge and skills.
Therefore, I made a decision to write some articles on my blog site to document my study process.
Preparation
Nodes
At first of the first, I need to understand a basic example structrue of the OpenStack.
Without doubt, this picture below is a reasonable and official one.

However, limited by the performance and small disk storage, I can only create mainly 2 nodes and an extra resource node to provide the images and repos.
I won’t create independent Object Storage Node and Block Storage Node while it’s a better choice to add 2 extra virtual disks to the Compute Node.
And for the Cinder Service, I will only provide 1 disk with 2 partitions to run the service.
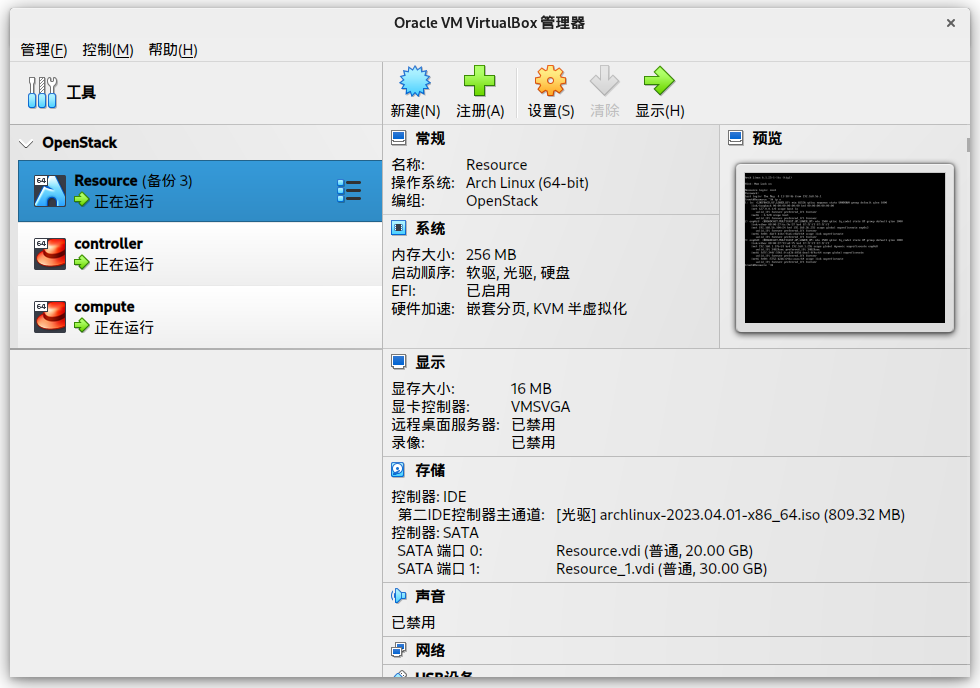
The details of my VirutalBox properties is blow:
By the way, I have to explain the Arch VM, it’s only a resource node to provide the HTTP downloading and yum repo service.
So I just use 256MB RAM and 1 core, but 2 disks to storage the multiple and large repo files.
Network
Network Interfaces
In order to set up the OpenStack Services, each node (compute and controller) need to use 2 network interfaces.
The first one is used to connect to the Management NetWork while the second one is used to connect the Operation Network.
| Network Interface |
Network |
Usage |
| enp0s3 |
192.168.56.0/24 |
Management NetWork |
| enp0s8 |
172.129.1.0/24 |
Operation Network |
Nodes IP Address
So the detail netowrk properties is below:
| Node |
Management Address |
Operation Address |
| controller |
192.168.56.2 |
172.129.1.1 |
| compute |
192.168.56.3 |
172.129.1.2 |
| Resource |
192.168.56.100 |
None |
Operating System
CentOS will be installed in the controller and compute and the Arch Linux will be installed in Resouce.
| Node |
OS |
| controller |
CentOS 7 |
| compute |
CentOS 7 |
| Resource |
Arch Linux |
Set up the network
Edit the file /etc/sysconfig/network-scripts/ifcfg-enp0s3 and /etc/sysconfig/network-scripts/ifcfg-enp0s8 on each nodes.
# vim /etc/sysconfig/network-scripts/ifcfg-enp0s3
# vim /etc/sysconfig/network-scripts/ifcfg-enp0s8
And Edit the file according to the sheet.
For example, the controller node is below:
/etc/sysconfig/network-scripts/ifcfg-enp0s3:
TYPE=Ethernet
PROXY_METHOD=none
BROWSER_ONLY=no
BOOTPROTO=static
DEFROUTE=yes
IPADDR=192.168.56.2
GATEWAY=192.168.56.1
PREFIX=24
IPV4_FAILURE_FATAL=no
IPV6INIT=yes
IPV6_AUTOCONF=yes
IPV6_DEFROUTE=yes
IPV6_FAILURE_FATAL=no
IPV6_ADDR_GEN_MODE=stable-privacy
NAME=enp0s3
UUID=d59932b3-b22e-4d55-893d-cdeb847bd619
DEVICE=enp0s3
ONBOOT=yes
/etc/sysconfig/network-scripts/ifcfg-enp0s8:
TYPE=Ethernet
PROXY_METHOD=none
BROWSER_ONLY=no
BOOTPROTO=static
DEFROUTE=yes
IPADDR=172.129.1.1
PREFIX=24
IPV4_FAILURE_FATAL=no
IPV6INIT=yes
IPV6_AUTOCONF=yes
IPV6_DEFROUTE=yes
IPV6_FAILURE_FATAL=no
IPV6_ADDR_GEN_MODE=stable-privacy
NAME=enp0s8
UUID=b02be511-361b-447f-b670-282850bce1f5
DEVICE=enp0s8
ONBOOT=yes
Start ssh service
Start sshd on each nodes.
# systemctl start sshd && systemctl enable sshd
Quiz
[Task 1] Building Private Cloud Services [10.5 points]
[Question 1] Basic environment configuration [0.5 points]
Using the provided username and password, log in to the provided OpenStack private cloud platform. Under the current tenancy, create two virtual machines using the CentOS7.9 image and 4vCPU/12G/100G_50G type. The second network card should be created and connected to both the controller and compute nodes (the second network card’s subnet is 10.10.X.0/24, where X represents the workstation number, and no routing is needed). Verify the security group policies to ensure normal network communication and ssh connection, and configure the servers as follows:
- Set the hostname of the control node to ‘controller’ and that of the compute node to ‘compute’;
- Modify the hosts file to map IP addresses to hostnames.
After completing the configuration, submit the username, password, and IP address of the control node in the answer box.
The first quiz is eazy, just some steps can be done.
At the controller Node:
[root@controller ~]# hostnamectl set-hostname controller
At the compute Node:
[root@compute ~]# hostnamectl set-hostname compute
Edit the file /etc/hosts:
[root@controller ~]# vim /etc/hosts
Write these:
127.0.0.1 localhost localhost.localdomain localhost4 localhost4.localdomain4
::1 localhost localhost.localdomain localhost6 localhost6.localdomain6
192.168.56.100 Resource
192.168.56.2 controller
192.168.56.3 compute
Save it by :wq.
Then send it to compute Node by scp:
[root@controller ~]# scp /etc/hosts root@compute:/etc/hosts
Finally, all the operation is complete.
[Question 2] Yum Repository Configuration [0.5 points]
Using the provided HTTP service address, there are CentOS 7.9 and IaaS network YUM repositories available under the HTTP service. Use this HTTP source as the network source for installing the IaaS platform. Set up the yum source file http.repo for both the controller node and compute node. After completion, submit the username, password, and IP address of the control node to the answer box.
Well, it’s still a easy question.
First, delete the old repo files in two nodes:
[root@controller ~]# rm -rfv /etc/yum.repos.d/*
[root@compute ~]# rm -rfv /etc/yum.repos.d/*
Second, according to the question, we should create and edit a file named after http.repo.
[root@controller ~]# vim /etc/yum.repos.d/http.repo
write the information below into the file:
[centos]
name=centos
baseurl=http://Resource/centos
gpgcheck=0
enabled=1
[iaas-repo]
name=centos
baseurl=http://Resource/iaas
gpgcheck=0
enabled=1
Then save it, and do the same operation in the compute node.
But there’s a quick way to use scp to copy the file to it.
[root@controller ~]# scp /etc/yum.repos.d/http.repo root@compute:/etc/yum.repos.d/http.repo
Then type the password of the root in compute node, the file will be sent.
And of course, I will use the quick way to do the same executions.
[Question 3] Configure SSH without keys [0.5 points]
Configure the controller node to access the compute node without a key, and then attempt an SSH connection to the hostname of the compute node for testing. After completion, submit the username, password, and IP address of the controller node in the answer box.
It’s also an easy and necessary operation we have to do, because we can make the controller node easier to transfer files and execute commands in compute node.
So the first thing we have to do is generate a ssh-key:
[root@controller ~]# ssh-keygen
Then press the Enter to confirm your requirements of generation according to the information in terminal.
Normally you will see these:
Generating public/private rsa key pair.
Enter file in which to save the key (/root/.ssh/id_rsa):
Enter passphrase (empty for no passphrase):
Enter same passphrase again:
Your identification has been saved in /root/.ssh/id_rsa
Your public key has been saved in /root/.ssh/id_rsa.pub
The key fingerprint is:
SHA256:FYN98pz53tfocj5Q4DO90jqqN+lJdzXi9WKMFNjm4Wc root@Resource
The key's randomart image is:
+---[RSA 3072]----+
| oo |
| . o=o |
| o*== |
| . +Ooo |
| S +BE+.|
| .+=*.o|
| ..o*=oo|
| .+o+o=.+|
| .++o *o..|
+----[SHA256]-----+
And now it’s time to put the key into the compute node!
Just simply execute the ssh-copy-id:
[root@controller ~]# ssh-copy-id root@compute
And type the password at the last time! You needn’t enter the ssh password of the compute node anymore!
Then this quiz is solved!
[Question 4] Basic Installation [0.5 points]
Install the openstack-iaas package on both the control node and compute node, and configure the basic variables in the script files of the two nodes according to Table 2 (the configuration script file is /etc/openstack/openrc.sh).
- Table 2 Cloud Platform Configuration Information
| Service Name |
Variable |
Parameter/Password |
| Mysql |
root |
000000 |
| Keystone |
000000 |
| Glance |
000000 |
| Nova |
000000 |
| Neutron |
000000 |
| Heat |
000000 |
| Zun |
000000 |
| Keystone |
DOMAIN_NAME |
demo |
| Admin |
000000 |
| Rabbit |
000000 |
| Glance |
000000 |
| Nova |
000000 |
| Neutron |
000000 |
| Heat |
000000 |
| Zun |
000000 |
| Neutron |
Metadata |
000000 |
| External Network |
eth1 (depending on actual situation) |
|
|
|
So according to the Quiz, we have to install the package openstack-iaas at first:
[root@controller ~]# yum install -y openstack-iaas
[root@compute ~]# yum install -y openstack-iaas
Then edit the file /etc/openstack/openrc.sh:
[root@controller ~]# vim /etc/openstack/openrc.sh
With the information provided by the tables, we can simply write them into it by using vim.
##--------------------system Config--------------------##
##Controller Server Manager IP. example:x.x.x.x
#HOST_IP=192.168.56.2
##Controller HOST Password. example:000000
#HOST_PASS=000000
##Controller Server hostname. example:controller
#HOST_NAME=controller
##Compute Node Manager IP. example:x.x.x.x
#HOST_IP_NODE=192.168.56.3
##Compute HOST Password. example:000000
#HOST_PASS_NODE=000000
##Compute Node hostname. example:compute
#HOST_NAME_NODE=compute
##--------------------Chrony Config-------------------##
##Controller network segment IP. example:x.x.0.0/16(x.x.x.0/24)
#network_segment_IP=192.168.56.0/24
......
But for all the PASS=000000 we can operate quickly by using the command.
Then you will spot that there is a # in each of the front of the variables, we need to execute this vim command to delete the first character:
Finally, we will get a file like this:
#--------------------system Config--------------------##
#Controller Server Manager IP. example:x.x.x.21x
HOST_IP=192.168.56.2
#Controller HOST Password. example:000000
HOST_PASS=000000
#Controller Server hostname. example:controller
HOST_NAME=controller
#Compute Node Manager IP. example:x.x.x.x
HOST_IP_NODE=192.168.56.3
#Compute HOST Password. example:000000
HOST_PASS_NODE=000000
#Compute Node hostname. example:compute
HOST_NAME_NODE=compute
#--------------------Chrony Config-------------------##
#Controller network segment IP. example:x.x.0.0/16(x.x.x.0/24)
network_segment_IP=192.168.56.0/24
#--------------------Rabbit Config ------------------##
#user for rabbit. example:openstack
RABBIT_USER=openstack
#Password for rabbit user .example:000000
RABBIT_PASS=000000
#--------------------MySQL Config---------------------##
#Password for MySQL root user . exmaple:000000
DB_PASS=000000
#--------------------Keystone Config------------------##
#Password for Keystore admin user. exmaple:000000
DOMAIN_NAME=demo
ADMIN_PASS=000000
DEMO_PASS=000000
#Password for Mysql keystore user. exmaple:000000
KEYSTONE_DBPASS=000000
#--------------------Glance Config--------------------##
#Password for Mysql glance user. exmaple:000000
GLANCE_DBPASS=000000
#Password for Keystore glance user. exmaple:000000
GLANCE_PASS=000000
#--------------------Placement Config----------------------##
#Password for Mysql placement user. exmaple:000000
PLACEMENT_DBPASS=000000
#Password for Keystore placement user. exmaple:000000
PLACEMENT_PASS=000000
#--------------------Nova Config----------------------##
#Password for Mysql nova user. exmaple:000000
NOVA_DBPASS=000000
#Password for Keystore nova user. exmaple:000000
NOVA_PASS=000000
#--------------------Neutron Config-------------------##
#Password for Mysql neutron user. exmaple:000000
NEUTRON_DBPASS=000000
#Password for Keystore neutron user. exmaple:000000
NEUTRON_PASS=000000
#metadata secret for neutron. exmaple:000000
METADATA_SECRET=000000
#External Network Interface. example:eth1
INTERFACE_NAME=enp0s3
#External Network The Physical Adapter. example:provider
Physical_NAME=provider1
#First Vlan ID in VLAN RANGE for VLAN Network. exmaple:101
minvlan=101
#Last Vlan ID in VLAN RANGE for VLAN Network. example:200
maxvlan=200
#--------------------Cinder Config--------------------##
#Password for Mysql cinder user. exmaple:000000
CINDER_DBPASS=000000
#Password for Keystore cinder user. exmaple:000000
CINDER_PASS=000000
#Cinder Block Disk. example:md126p3
BLOCK_DISK=sdb1
#--------------------Swift Config---------------------##
#Password for Keystore swift user. exmaple:000000
SWIFT_PASS=000000
#The NODE Object Disk for Swift. example:md126p4.
OBJECT_DISK=sdb2
#The NODE IP for Swift Storage Network. example:x.x.x.x.
STORAGE_LOCAL_NET_IP=172.129.1.2
#--------------------Trove Config----------------------##
#Password for Mysql trove user. exmaple:000000
TROVE_DBPASS=000000
#Password for Keystore trove user. exmaple:000000
TROVE_PASS=000000
#--------------------Heat Config----------------------##
#Password for Mysql heat user. exmaple:000000
HEAT_DBPASS=000000
#Password for Keystore heat user. exmaple:000000
HEAT_PASS=000000
#--------------------Ceilometer Config----------------##
#Password for Gnocchi ceilometer user. exmaple:000000
CEILOMETER_DBPASS=000000
#Password for Keystore ceilometer user. exmaple:000000
CEILOMETER_PASS=000000
#--------------------AODH Config----------------##
#Password for Mysql AODH user. exmaple:000000
AODH_DBPASS=000000
#Password for Keystore AODH user. exmaple:000000
AODH_PASS=000000
#--------------------ZUN Config----------------##
#Password for Mysql ZUN user. exmaple:000000
ZUN_DBPASS=000000
#Password for Keystore ZUN user. exmaple:000000
ZUN_PASS=000000
#Password for Keystore KURYR user. exmaple:000000
KURYR_PASS=000000
#--------------------OCTAVIA Config----------------##
#Password for Mysql OCTAVIA user. exmaple:000000
OCTAVIA_DBPASS=000000
#Password for Keystore OCTAVIA user. exmaple:000000
OCTAVIA_PASS=000000
#--------------------Manila Config----------------##
#Password for Mysql Manila user. exmaple:000000
MANILA_DBPASS=000000
#Password for Keystore Manila user. exmaple:000000
MANILA_PASS=000000
#The NODE Object Disk for Manila. example:md126p5.
SHARE_DISK=sdc1
#--------------------Cloudkitty Config----------------##
#Password for Mysql Cloudkitty user. exmaple:000000
CLOUDKITTY_DBPASS=000000
#Password for Keystore Cloudkitty user. exmaple:000000
CLOUDKITTY_PASS=000000
#--------------------Barbican Config----------------##
#Password for Mysql Barbican user. exmaple:000000
BARBICAN_DBPASS=000000
#Password for Keystore Barbican user. exmaple:000000
BARBICAN_PASS=000000
And then execute the scp command to copy it to the compute node, this Quiz gonna be solved!
[root@controller ~]# scp /etc/openstack/openrc.sh root@compute:/etc/openstack/openrc.sh
[Question 5] Database Installation and Tuning [1.0 point]
Use the iaas-install-mysql.sh script on the controller node to install services such as Mariadb, Memcached, and RabbitMQ. After installing the services, modify the /etc/my.cnf file to meet the following requirements:
- Set the database to support case sensitivity;
- Set the cache for innodb table indexes, data, and insert data buffer to 4GB;
- Set the database’s log buffer to 64MB;
- Set the size of the database’s redo log to 256MB;
- Set the number of redo log file groups for the database to 2. After completing the configuration, submit the username, password, and IP address of the controller node in the answer box.
Before we execute the iaas-install-mysql.sh to install services, we need to run the iaas-pre-host.sh script on each nodes, in order to install some packages the services need.
[root@controller ~]# cd /usr/local/bin/
[root@controller bin]# ./iaas-pre-host.sh
[root@compute ~]# cd /usr/local/bin/
[root@compute bin]# ./iaas-pre-host.sh
After the script finished, we need to reconnect the ssh shell or reboot the system of each nodes.
Then we can do the first step, run iaas-install-mysql.sh in controller node.
[root@controller bin]# ./iaas-install-mysql.sh
And we edit the file /etc/my.cnf.
[root@controller bin]# vim /etc/my.cnf
Add these properties into it:
lower_case_table_names = 1
innodb_buffer_pool_size = 4G
innodb_log_buffer_size = 64M
innodb_log_file_size = 256M
innodb_log_files_in_group = 2
Make sure your file look like this:
#
# This group is read both both by the client and the server
# use it for options that affect everything
#
[client-server]
#
# This group is read by the server
#
[mysqld]
# Disabling symbolic-links is recommended to prevent assorted security risks
lower_case_table_names = 1
innodb_buffer_pool_size = 4G
innodb_log_buffer_size = 64M
innodb_log_file_size = 256M
innodb_log_files_in_group = 2
symbolic-links=0
default-storage-engine = innodb
innodb_file_per_table
collation-server = utf8_general_ci
init-connect = 'SET NAMES utf8'
character-set-server = utf8
max_connections=10000
default-storage-engine = innodb
innodb_file_per_table
collation-server = utf8_general_ci
init-connect = 'SET NAMES utf8'
character-set-server = utf8
max_connections=10000
#
# include all files from the config directory
#
!includedir /etc/my.cnf.d
Finally we Save it.
The quiz was sovled!
[Question 6] Keystone Service Installation and Usage [0.5 points]
Use the iaas-install-keystone.sh script on the controller node to install the Keystone service. After installation, use the relevant commands to create a user named chinaskill with the password 000000. Upon completion, submit the username, password, and IP address of the controller node in the answer box.
To install the Keystone service, we need to run the iaas-install-keystone.sh script:
[root@controller bin]# ./iaas-install-keystone.sh
If the installation is successful, the information backed should be like:
......
Complete!
Created symlink from /etc/systemd/system/multi-user.target.wants/httpd.service to /usr/lib/systemd/system/httpd.service.
+-------------+----------------------------------+
| Field | Value |
+-------------+----------------------------------+
| description | Default Domain |
| enabled | True |
| id | ff38535aa995441d8641b24d86881583 |
| name | demo |
| options | {} |
| tags | [] |
+-------------+----------------------------------+
+-------------+----------------------------------+
| Field | Value |
+-------------+----------------------------------+
| description | Admin project |
| domain_id | ff38535aa995441d8641b24d86881583 |
| enabled | True |
| id | b0787807ee924b179cc02799bc595d38 |
| is_domain | False |
| name | myadmin |
| options | {} |
| parent_id | ff38535aa995441d8641b24d86881583 |
| tags | [] |
+-------------+----------------------------------+
+---------------------+----------------------------------+
| Field | Value |
+---------------------+----------------------------------+
| domain_id | ff38535aa995441d8641b24d86881583 |
| enabled | True |
| id | 7b4df65fc3ac4d4e8a764c74f0178153 |
| name | myadmin |
| options | {} |
| password_expires_at | None |
+---------------------+----------------------------------+
+-------------+----------------------------------+
| Field | Value |
+-------------+----------------------------------+
| description | Service Project |
| domain_id | ff38535aa995441d8641b24d86881583 |
| enabled | True |
| id | 4eca281ad75c45669f8b178f0d26944d |
| is_domain | False |
| name | service |
| options | {} |
| parent_id | ff38535aa995441d8641b24d86881583 |
| tags | [] |
+-------------+----------------------------------+
+-------------+----------------------------------+
| Field | Value |
+-------------+----------------------------------+
| description | Demo Project |
| domain_id | ff38535aa995441d8641b24d86881583 |
| enabled | True |
| id | 1256dce1e4c843b99cf50e0739308313 |
| is_domain | False |
| name | demo |
| options | {} |
| parent_id | ff38535aa995441d8641b24d86881583 |
| tags | [] |
+-------------+----------------------------------+
+---------------------+----------------------------------+
| Field | Value |
+---------------------+----------------------------------+
| domain_id | ff38535aa995441d8641b24d86881583 |
| enabled | True |
| id | c9f1413519a84c8ba0f9efd4d3f8d728 |
| name | demo |
| options | {} |
| password_expires_at | None |
+---------------------+----------------------------------+
+-------------+----------------------------------+
| Field | Value |
+-------------+----------------------------------+
| description | None |
| domain_id | None |
| id | 7ad524a1308d4089a01347dbf09d2044 |
| name | user |
| options | {} |
+-------------+----------------------------------+
+------------+-----------------------------------------------------------------------------------------------------------------------------------------------------------------------------------------+
| Field | Value |
+------------+-----------------------------------------------------------------------------------------------------------------------------------------------------------------------------------------+
| expires | 2023-05-05T14:51:32+0000 |
| id | gAAAAABkVQnk9i7FQoKaw9VKNqZuEbVOmoaE-bCPPYlEy-kBqZyxOmk9o3PKLt6IxyCnfU9jO_dvd7yMpGl9LuhaXqiFHycPiIUSCoP-har-EhxmH1IUWK303DcD6jGi4GvBufnTtx7tYIIJgrA-NdMCRJu2lkSnKxCwmvI8pjz7drBwnxDl9Ps |
| project_id | b0787807ee924b179cc02799bc595d38 |
| user_id | 7b4df65fc3ac4d4e8a764c74f0178153 |
+------------+-----------------------------------------------------------------------------------------------------------------------------------------------------------------------------------------+
After the installation, we need to create a user named ‘chinaskill’ according to the question.
So, first we use the source command to read the variables of Keystone:
[root@controller bin]# source /etc/keystone/admin-openrc.sh
Then create the user by using openstack command
[root@controller bin]# openstack user create --domain demo --password-prompt chinaskill
Then type the password 000000, you will get these information:
User Password:
Repeat User Password:
+---------------------+----------------------------------+
| Field | Value |
+---------------------+----------------------------------+
| domain_id | ff38535aa995441d8641b24d86881583 |
| enabled | True |
| id | 206814a5dfba4a9194701d124a815ca3 |
| name | chinaskill |
| options | {} |
| password_expires_at | None |
+---------------------+----------------------------------+
It means that you create the user successfully! And this quiz was also solved!
[Question 7] Glance Installation and Usage [0.5 points]
Use the iaas-install-glance.sh script on the controller node to install the glance service. Use the command to upload the provided cirros-0.3.4-x86_64-disk.img image (which is available on an HTTP service and can be downloaded independently) to the platform, name it cirros, and set the minimum required disk size for startup to 10G and the minimum required memory for startup to 1G. After completion, submit the username, password, and IP address of the controller node to the answer box.
Well, it’s a little chanllenging, isn’t it?
But don’t worry, we do the installation at first:
[root@controller bin]# ./iaas-install-glance.sh
Then we download the cirros-0.3.4-x86_64-disk.img
[root@controller bin]# cd ~
[root@controller ~]# wget http://192.168.56.100/img/cirros-0.3.4-x86_64-disk.img
Confirm the filename:
[root@controller ~]# ls -lh
total 13M
-rw-------. 1 root root 1.3K May 4 16:09 anaconda-ks.cfg
-rw-r--r-- 1 root root 13M Apr 27 2022 cirros-0.3.4-x86_64-disk.img
Then we execute the command to upload the image:
[root@controller ~]# openstack image create --disk-format qcow2 --container-format bare --min-disk 10 --min-ram 1024 --file ./cirros-0.3.4-x86_64-disk.img cirros
Then you will see the result returned by terminal:
+------------------+--------------------------------------------------------------------------------------------------------------------------------------------------------------------------------------------+
| Field | Value |
+------------------+--------------------------------------------------------------------------------------------------------------------------------------------------------------------------------------------+
| checksum | ee1eca47dc88f4879d8a229cc70a07c6 |
| container_format | bare |
| created_at | 2023-05-05T15:01:42Z |
| disk_format | qcow2 |
| file | /v2/images/62102ae0-27c3-4bc1-ad87-44be814237f4/file |
| id | 62102ae0-27c3-4bc1-ad87-44be814237f4 |
| min_disk | 10 |
| min_ram | 1024 |
| name | cirros |
| owner | b0787807ee924b179cc02799bc595d38 |
| properties | os_hash_algo='sha512', os_hash_value='1b03ca1bc3fafe448b90583c12f367949f8b0e665685979d95b004e48574b953316799e23240f4f739d1b5eb4c4ca24d38fdc6f4f9d8247a2bc64db25d6bbdb2', os_hidden='False' |
| protected | False |
| schema | /v2/schemas/image |
| size | 13287936 |
| status | active |
| tags | |
| updated_at | 2023-05-05T15:01:42Z |
| virtual_size | None |
| visibility | shared |
+------------------+--------------------------------------------------------------------------------------------------------------------------------------------------------------------------------------------+
It means the operation is finished and successful!
Now this quiz was solved!
[Question 8] Nova Installation and Optimization [0.5 points]
Use the iaas-install-placement.sh, iaas-install-nova-controller.sh, and iaas-install-nova-compute.sh scripts to install the Nova service on the controller node and compute node respectively. After installation, please modify the relevant Nova configuration files to solve the problem of virtual machine startup timeout due to long waiting time, which leads to failure to obtain IP address and error reporting. After configuring, submit the username, password, and IP address of the controller node to the answer box.
We should run iaas-install-placement.sh script in controller node to install the placment service at first:
[root@controller ~]# cd /usr/local/bin/
[root@controller bin]# ./iaas-install-placement.sh
After installation of placement, we should run iaas-install-nova-controller.sh script to install nova service in controller node:
[root@controller bin]# ./iaas-install-nova-controller.sh
Then we should install nova service in compute node, but before that we should copy the public key of controller node to it.
So we run:
[root@compute ~]# ssh-copy-id root@controller
Then run iaas-install-nova-compute.sh:
[root@compute ~]# cd /usr/local/bin/
[root@compute bin]# ./iaas-install-nova-compute.sh
Installed!
+----+--------------+---------+------+---------+-------+------------+
| ID | Binary | Host | Zone | Status | State | Updated At |
+----+--------------+---------+------+---------+-------+------------+
| 6 | nova-compute | compute | nova | enabled | up | None |
+----+--------------+---------+------+---------+-------+------------+
Found 2 cell mappings.
Skipping cell0 since it does not contain hosts.
Getting computes from cell 'cell1': d955f2a9-ec41-4ea0-b72a-8f3c38977c2e
Checking host mapping for compute host 'compute': c17f7c5c-5821-4891-b6ca-a6684b028db1
Creating host mapping for compute host 'compute': c17f7c5c-5821-4891-b6ca-a6684b028db1
Found 1 unmapped computes in cell: d955f2a9-ec41-4ea0-b72a-8f3c38977c2e
Then run the check command in controller to verify if the nova service installed successfully!
[root@controller bin]# source /etc/keystone/admin-openrc.sh
[root@controller bin]# openstack compute service list
And you will see the hostname of compute node:
+----+----------------+------------+----------+---------+-------+----------------------------+
| ID | Binary | Host | Zone | Status | State | Updated At |
+----+----------------+------------+----------+---------+-------+----------------------------+
| 4 | nova-conductor | controller | internal | enabled | up | 2023-05-06T03:14:27.000000 |
| 5 | nova-scheduler | controller | internal | enabled | up | 2023-05-06T03:14:28.000000 |
| 6 | nova-compute | compute | nova | enabled | up | 2023-05-06T03:14:25.000000 |
+----+----------------+------------+----------+---------+-------+----------------------------+
Ok, now we should do the final operation, edit the file /etc/nova/nova.conf
[root@controller bin]# vim /etc/nova/nova.conf
Just simply change #vif_plugging_is_fatal=true to vif_plugging_is_fatal=false, but we can use vim command quickly:
:%s/#vif_plugging_is_fatal=true/vif_plugging_is_fatal=false/g
And save it!
So we solved a quiz again! Congratulations!
[Question 9] Neutron Installation [0.5 points]
Using the provided scripts iaas-install-neutron-controller.sh and iaas-install-neutron-compute.sh, install the neutron service on the controller and compute nodes. After completion, submit the username, password, and IP address of the control node to the answer box.
This quiz is easy, just run the scripts in each nodes:
[root@controller bin]# ./iaas-install-neutron-controller.sh
[root@compute bin]# ./iaas-install-neutron-compute.sh
Then the Neutron Service was installed successfully! Quiz Solved!
[Question 10] Installation of Doshboard [0.5 points]
Use the iaas-install-dashboad.sh script to install the dashboard service on the controller node. After installation, modify the Djingo data in the Dashboard to be stored in a file (this modification solves the problem of ALL-in-one snapshots not being accessible in other cloud platform dashboards). After completion, submit the username, password and IP address of the controller node to the answer box.
Run iaas-install-dashboad.sh script:
[root@controller bin]# ./iaas-install-dashboard.sh
Edit the file /etc/openstack-dashboard/local_settings
[root@controller bin]# vim /etc/openstack-dashboard/local_settings
Replace SESSION_ENGINE = 'django.contrib.sessions.backends.cache' to SESSION_ENGINE = 'django.contrib.sessions.backends.file'
:%s/SESSION_ENGINE = 'django.contrib.sessions.backends.cache'/SESSION_ENGINE = 'django.contrib.sessions.backends.file'/g
Save the file:
And visit the Dashboard by browser
http://192.168.56.2/dashboard
You will see the login page.
Login with username admin and password 000000.
Then Dashboard was installed successfully.
[Question 11] Swift Installation [0.5 points]
Use the iaas-install-swift-controller.sh and iaas-install-swift-compute.sh scripts to install the Swift service on the control and compute nodes respectively. After installation, use a command to create a container named “examcontainer”, upload the cirros-0.3.4-x86_64-disk.img image to the “examcontainer” container, and set segment storage with a size of 10M for each segment. Once completed, submit the username, password, and IP address of the control node to the answer box.
At first we need to create partitions in compute node
We need to check the disks:
[root@compute bin]# fdisk -l
Disk /dev/sda: 53.7 GB, 53687091200 bytes, 104857600 sectors
Units = sectors of 1 * 512 = 512 bytes
Sector size (logical/physical): 512 bytes / 512 bytes
I/O size (minimum/optimal): 512 bytes / 512 bytes
Disk label type: dos
Disk identifier: 0x000d6c03
Device Boot Start End Blocks Id System
/dev/sda1 * 2048 2099199 1048576 83 Linux
/dev/sda2 2099200 104857599 51379200 8e Linux LVM
Disk /dev/sdb: 21.5 GB, 21474836480 bytes, 41943040 sectors
Units = sectors of 1 * 512 = 512 bytes
Sector size (logical/physical): 512 bytes / 512 bytes
I/O size (minimum/optimal): 512 bytes / 512 bytes
Disk /dev/sdc: 3221 MB, 3221225472 bytes, 6291456 sectors
Units = sectors of 1 * 512 = 512 bytes
Sector size (logical/physical): 512 bytes / 512 bytes
I/O size (minimum/optimal): 512 bytes / 512 bytes
Disk /dev/mapper/centos-root: 48.4 GB, 48444211200 bytes, 94617600 sectors
Units = sectors of 1 * 512 = 512 bytes
Sector size (logical/physical): 512 bytes / 512 bytes
I/O size (minimum/optimal): 512 bytes / 512 bytes
Disk /dev/mapper/centos-swap: 4160 MB, 4160749568 bytes, 8126464 sectors
Units = sectors of 1 * 512 = 512 bytes
Sector size (logical/physical): 512 bytes / 512 bytes
I/O size (minimum/optimal): 512 bytes / 512 bytes
We’ll get information below:
We need create 2 partitions in sdb: sdb1 and sdb2
sdb1 for cinder and sdb2 for swift.
[root@compute bin]# fdisk /dev/sdb
Welcome to fdisk (util-linux 2.23.2).
Changes will remain in memory only, until you decide to write them.
Be careful before using the write command.
Device does not contain a recognized partition table
Building a new DOS disklabel with disk identifier 0xe8f17fde.
Command (m for help): n
Partition type:
p primary (0 primary, 0 extended, 4 free)
e extended
Select (default p): p
Partition number (1-4, default 1):
First sector (2048-41943039, default 2048): +10G
Last sector, +sectors or +size{K,M,G} (20971520-41943039, default 41943039):
Using default value 41943039
Partition 1 of type Linux and of size 10 GiB is set
Command (m for help): n
Partition type:
p primary (1 primary, 0 extended, 3 free)
e extended
Select (default p): p
Partition number (2-4, default 2):
First sector (2048-41943039, default 2048):
Using default value 2048
Last sector, +sectors or +size{K,M,G} (2048-20971519, default 20971519):
Using default value 20971519
Partition 2 of type Linux and of size 10 GiB is set
Command (m for help): p
Disk /dev/sdb: 21.5 GB, 21474836480 bytes, 41943040 sectors
Units = sectors of 1 * 512 = 512 bytes
Sector size (logical/physical): 512 bytes / 512 bytes
I/O size (minimum/optimal): 512 bytes / 512 bytes
Disk label type: dos
Disk identifier: 0xe8f17fde
Device Boot Start End Blocks Id System
/dev/sdb1 20971520 41943039 10485760 83 Linux
/dev/sdb2 2048 20971519 10484736 83 Linux
Partition table entries are not in disk order
Command (m for help): w
The partition table has been altered!
Calling ioctl() to re-read partition table.
Syncing disks.
Format the partitions:
[root@compute bin]# mkfs.ext4 /dev/sdb1
mke2fs 1.42.9 (28-Dec-2013)
Filesystem label=
OS type: Linux
Block size=4096 (log=2)
Fragment size=4096 (log=2)
Stride=0 blocks, Stripe width=0 blocks
655360 inodes, 2621440 blocks
131072 blocks (5.00%) reserved for the super user
First data block=0
Maximum filesystem blocks=2151677952
80 block groups
32768 blocks per group, 32768 fragments per group
8192 inodes per group
Superblock backups stored on blocks:
32768, 98304, 163840, 229376, 294912, 819200, 884736, 1605632
Allocating group tables: done
Writing inode tables: done
Creating journal (32768 blocks): done
Writing superblocks and filesystem accounting information: done
[root@compute bin]# mkfs.ext4 /dev/sdb2
mke2fs 1.42.9 (28-Dec-2013)
Filesystem label=
OS type: Linux
Block size=4096 (log=2)
Fragment size=4096 (log=2)
Stride=0 blocks, Stripe width=0 blocks
655360 inodes, 2621184 blocks
131059 blocks (5.00%) reserved for the super user
First data block=0
Maximum filesystem blocks=2151677952
80 block groups
32768 blocks per group, 32768 fragments per group
8192 inodes per group
Superblock backups stored on blocks:
32768, 98304, 163840, 229376, 294912, 819200, 884736, 1605632
Allocating group tables: done
Writing inode tables: done
Creating journal (32768 blocks): done
Writing superblocks and filesystem accounting information: done
Then run iaas-install-swift-controller.sh and iaas-install-swift-compute.sh scripts:
[root@controller bin]# ./iaas-install-swift-controller.sh
[root@compute bin]# ./iaas-install-swift-compute.sh
Back to /root directory(Or other location of cirros-0.3.4-x86_64-disk.img):
[root@controller bin]# cd ~
Create a container named examcontainer:
[root@controller ~]# swift post examcontainer
Upload the cirros-0.3.4-x86_64-disk.img image to the “examcontainer” container, and set segment storage with a size of 10M for each segment.
[root@controller ~]# swift upload examcontainer -S 10000000 cirros-0.3.4-x86_64-disk.img
cirros-0.3.4-x86_64-disk.img segment 1
cirros-0.3.4-x86_64-disk.img segment 0
cirros-0.3.4-x86_64-disk.img
Then it’s finished.
[Question 12] Creating a Cinder volume [0.5 points]
Using the iaas-install-cinder-controller.sh and iaas-install-cinder-compute.sh scripts, install the Cinder service on both the control node and compute node. On the compute node, expand the block storage by creating an additional 5GB partition and adding it to the back-end storage for Cinder block storage. After completion, submit the username, password, and IP address of the compute node to the answer box.
Install the Cinder Service in controller node:
[root@controller bin]# ./iaas-install-cinder-controller.sh
Install the Cinder Service in compute node:
[root@compute bin]# ./iaas-install-cinder-compute.sh
Check if succeed:
[root@compute bin]# lsblk
NAME MAJ:MIN RM SIZE RO TYPE MOUNTPOINT
sda 8:0 0 50G 0 disk
├─sda1 8:1 0 1G 0 part /boot
└─sda2 8:2 0 49G 0 part
├─centos-root 253:0 0 45.1G 0 lvm /
└─centos-swap 253:1 0 3.9G 0 lvm [SWAP]
sdb 8:16 0 20G 0 disk
├─sdb1 8:17 0 10G 0 part
│ ├─cinder--volumes-cinder--volumes--pool_tmeta 253:2 0 12M 0 lvm
│ │ └─cinder--volumes-cinder--volumes--pool 253:4 0 9.5G 0 lvm
│ └─cinder--volumes-cinder--volumes--pool_tdata 253:3 0 9.5G 0 lvm
│ └─cinder--volumes-cinder--volumes--pool 253:4 0 9.5G 0 lvm
└─sdb2 8:18 0 10G 0 part /swift/node/sdb2
sdc 8:32 0 3G 0 disk
sr0 11:0 1 1024M 0 rom
[root@compute bin]# vgdisplay
--- Volume group ---
VG Name cinder-volumes
System ID
Format lvm2
Metadata Areas 1
Metadata Sequence No 4
VG Access read/write
VG Status resizable
MAX LV 0
Cur LV 1
Open LV 0
Max PV 0
Cur PV 1
Act PV 1
VG Size <10.00 GiB
PE Size 4.00 MiB
Total PE 2559
Alloc PE / Size 2438 / 9.52 GiB
Free PE / Size 121 / 484.00 MiB
VG UUID QHk53K-Kj2O-ilc2-pxk6-Upqe-meRE-vfJu6P
--- Volume group ---
VG Name centos
System ID
Format lvm2
Metadata Areas 1
Metadata Sequence No 3
VG Access read/write
VG Status resizable
MAX LV 0
Cur LV 2
Open LV 2
Max PV 0
Cur PV 1
Act PV 1
VG Size <49.00 GiB
PE Size 4.00 MiB
Total PE 12543
Alloc PE / Size 12542 / 48.99 GiB
Free PE / Size 1 / 4.00 MiB
VG UUID 2tEud0-Ydx6-cFfX-dZMM-F9IC-l3nc-sLS38v
Well, it’s finished.
[Question 13] Installation and Usage of Manila Service [0.5 point]
Install the Manila service on the control and compute nodes using the iaas-install-manila-controller.sh and iaas-install-manila-compute.sh scripts, respectively. After installing the service, create a default_share_type share type (without driver support), and then create a shared storage called share01 with a size of 2G and grant permission for OpenStack management network segment to access the share01 directory. Finally, submit the username, password, and IP address of the control node to the answer box.
Create a partion for Manila:
[root@compute bin]# fdisk /dev/sdc
Welcome to fdisk (util-linux 2.23.2).
Changes will remain in memory only, until you decide to write them.
Be careful before using the write command.
Device does not contain a recognized partition table
Building a new DOS disklabel with disk identifier 0x6e07efc2.
Command (m for help): n
Partition type:
p primary (0 primary, 0 extended, 4 free)
e extended
Select (default p): p
Partition number (1-4, default 1):
First sector (2048-6291455, default 2048):
Using default value 2048
Last sector, +sectors or +size{K,M,G} (2048-6291455, default 6291455):
Using default value 6291455
Partition 1 of type Linux and of size 3 GiB is set
Command (m for help): w
The partition table has been altered!
Calling ioctl() to re-read partition table.
Syncing disks.
Installl the Manila Service in controller node:
[root@controller bin]# ./iaas-install-manila-controller.sh
Install the Manila Service in compute node:
[root@compute bin]# ./iaas-install-manila-compute.sh
Create a default_share_type share type (without driver support):
[root@controller bin]# manila type-create default_share_type False
Check the manila type list:
[root@controller bin]# manila type-list
Create a shared storage called share01 with a size of 2G
[root@controller bin]# manila create NFS 2 --name share01
Check if the operation succeed:
[root@controller bin]# manila list
+--------------------------------------+---------+------+-------------+-----------+-----------+--------------------+-----------------------------+-------------------+
| ID | Name | Size | Share Proto | Status | Is Public | Share Type Name | Host | Availability Zone |
+--------------------------------------+---------+------+-------------+-----------+-----------+--------------------+-----------------------------+-------------------+
| 0cdd5acb-5e54-4cdd-9187-467e2800d212 | share01 | 2 | NFS | available | False | default_share_type | compute@lvm#lvm-single-pool | nova |
+--------------------------------------+---------+------+-------------+-----------+-----------+--------------------+-----------------------------+-------------------+
Grant permission for OpenStack management network segment to access the share01 directory.
[root@controller bin]# manila access-allow share01 ip 192.168.56.0/24 --access-level rw
Check if the operation succeed!
[root@controller bin]# manila access-list share01
+--------------------------------------+-------------+-----------------+--------------+--------+------------+----------------------------+------------+
| id | access_type | access_to | access_level | state | access_key | created_at | updated_at |
+--------------------------------------+-------------+-----------------+--------------+--------+------------+----------------------------+------------+
| cad9f433-6ad3-4db9-afe1-90dc52374a08 | ip | 192.168.56.0/24 | rw | active | None | 2023-05-06T06:55:13.000000 | None |
+--------------------------------------+-------------+-----------------+--------------+--------+------------+----------------------------+------------+
Done!
[Question 14] Barbican Service Installation and Usage [0.5 points]
Install the Barbican service using the iaas-install-barbican.sh script. After the installation is complete, use the openstack command to create a key named “secret01”. Once created, submit the username, password, and IP address of the control node in the answer box.
Well, it’s easy, run iaas-install-barbican.sh in controller node.
[root@controller bin]# ./iaas-install-barbican.sh
Create a key named “secret01”
[root@controller bin]# openstack secret store --name secret01 --payload secretkey
Done!
[Question 15] Cloudkitty Service Installation and Usage [0.5 points]
Install the cloudkitty service using the iaas-install-cloudkitty.sh script. After installation, enable the hashmap rating module and then create the volume_thresholds group. Create a service matching rule for volume.size and set the price per GB to 0.01. Next, apply discounts to corresponding large amounts of data. Create a threshold in the volume_thresholds group and set a discount of 2% (0.98) if the threshold is exceeded for volumes over 50GB. After completing the setup, submit the username, password, and IP address of the control node in the answer box.
Run the script to install the service:
[root@controller bin]# ./iaas-install-cloudkitty.sh
Enable hashmap:
[root@controller bin]# openstack rating module enable hashmap
Create hashmap service
[root@controller bin]# openstack rating hashmap service create volume.size
+-------------+--------------------------------------+
| Name | Service ID |
+-------------+--------------------------------------+
| volume.size | 12b61017-6842-4d54-aa44-599d121e5f46 |
+-------------+--------------------------------------+
Create hashmap service group
[root@controller bin]# openstack rating hashmap group create volume_thresholds
+-------------------+--------------------------------------+
| Name | Group ID |
+-------------------+--------------------------------------+
| volume_thresholds | c46c8a1e-1878-4c44-bf36-57c06ce0672b |
+-------------------+--------------------------------------+
Create volume price
[root@controller bin]# openstack rating hashmap mapping create -s 12b61017-6842-4d54-aa44-599d121e5f46 -g c46c8a1e-1878-4c44-bf36-57c06ce0672b -t flat 0.01
+--------------------------------------+-------+------------+------+----------+--------------------------------------+--------------------------------------+------------+
| Mapping ID | Value | Cost | Type | Field ID | Service ID | Group ID | Project ID |
+--------------------------------------+-------+------------+------+----------+--------------------------------------+--------------------------------------+------------+
| e5f99784-e49c-47ac-98e0-6f818c3ff6fb | None | 0.01000000 | flat | None | 12b61017-6842-4d54-aa44-599d121e5f46 | c46c8a1e-1878-4c44-bf36-57c06ce0672b | None |
+--------------------------------------+-------+------------+------+----------+--------------------------------------+--------------------------------------+------------+
Create service rule
[root@controller bin]# openstack rating hashmap threshold create -s 12b61017-6842-4d54-aa44-599d121e5f46 -g c46c8a1e-1878-4c44-bf36-57c06ce0672b -t rate 50 0.98
+--------------------------------------+-------------+------------+------+----------+--------------------------------------+--------------------------------------+------------+
| Threshold ID | Level | Cost | Type | Field ID | Service ID | Group ID | Project ID |
+--------------------------------------+-------------+------------+------+----------+--------------------------------------+--------------------------------------+------------+
| a88e4768-defd-4c72-91f2-521b28e3c1a2 | 50.00000000 | 0.98000000 | rate | None | 12b61017-6842-4d54-aa44-599d121e5f46 | c46c8a1e-1878-4c44-bf36-57c06ce0672b | None |
+--------------------------------------+-------------+------------+------+----------+--------------------------------------+--------------------------------------+------------+
Done!
[Question 16] OpenStack Platform Memory Optimization [0.5 points]
After setting up the OpenStack platform, disable memory sharing in the system and enable transparent huge pages. After completing this, submit the username, password, and IP address of the control node to the answer box.
[root@controller ~]# find / -name defrag
Disable memory sharing in the system and enable transparent huge pages.
[root@controller ~]# echo never > /sys/kernel/mm/transparent_hugepage/defrag
Check the fianl result:
[root@controller ~]# cat /sys/kernel/mm/transparent_hugepage/defrag
always madvise [never]
Done!
Question 17] Modify file handle count [0.5 points]
In a Linux server with high concurrency, it is often necessary to tune the Linux parameters in advance. By default, Linux only allows a maximum of 1024 file handles. When your server reaches its limit during high concurrency, you will encounter the error message “too many open files”. To address this, create a cloud instance and modify the relevant configuration to permanently increase the maximum file handle count to 65535 for the control node. After completing the configuration, submit the username, password, and IP address of the controller node to the answer box.
Get the information of the maximum file handles:
[root@controller ~]# ulimit -n
1024
Change the settings:
[root@controller ~]# echo "* soft nofile 65535" >> /etc/security/limits.conf
[root@controller ~]# echo "* hard nofile 65535" >> /etc/security/limits.conf
Finally just reconnect to the ssh shell, and get the maximum file handles again.
[root@controller ~]# ulimit -n
65535
[Question 18] Linux System Tuning - Dirty Data Writing Back [1.0 point]
There may be dirty data in the memory of a Linux system, and the system generally defaults to writing back to the disk after 30 seconds of dirty data. Modify the system configuration file to temporarily adjust the time for writing back to the disk to 60 seconds. After completion, submit the username, password, and IP address of the controller node to the answer box.
Just edit the file /etc/sysctl.conf:
[root@controller ~]# vim /etc/sysctl.conf
Add this property into it:
vm.dirty_writeback_centisecs = 6000
Then execute:
[root@controller ~]# sysctl -p
Verify:
[root@controller ~]# cat /proc/sys/vm/dirty_writeback_centisecs
6000
Done!
[Question 19] Linux System Tuning - Preventing SYN Attacks [0.5 points]
Modify the relevant configuration files on the controller node to enable SYN cookies and prevent SYN flood attacks. After completion, submit the username, password, and IP address of the controller node to the answer box.
Edit the file /etc/sysctl.conf
[root@controller ~]# vim /etc/sysctl.conf
Add these properties into it:
net.ipv4.tcp_max_syn_backlog=2048
net.ipv4.tcp_syncookies=1
net.ipv4.tcp_syn_retries = 0
Then execute:
[root@controller ~]# sysctl -p
Done!
Conclusion
Well, finally, I finished all the steps of establishing the OpenStack!
These are the notes of the process.