非机动车交通规则测验
2025年8月7日 17:34
点击下方链接参与测验:
点击下方链接参与测验:
![]()
Porto is a modern software architectural pattern, consisting of guidelines, principles and patterns to help developers organize their code in a highly maintainable and reusable way.
Porto is a great option for medium to large sized web projects, as they tend to have higher complexity over time.
With Porto developers can build super scalable monolithics, which can be easily splitted into multiple micro-services whenever needed. While enabling the reusability of the business logic (Application Features), across multiple projects.
Porto inherits concepts from the DDD (Domain Driven Design), Modular, Micro Kernel, MVC (Model View Controller), Layered and ADR (Action Domain Responder) architectures.
And it adheres to a list of convenient design principles such as SOLID, OOP, LIFT, DRY, CoC, GRASP, Generalization, High Cohesion and Low Coupling.
It started as an experimental architecture, aiming at solving the common problems web developers face, when building large projects.
Feedbacks & Contributions are much appreciated.
“Simplicity is prerequisite for reliability.” — Edsger Dijkstra
At its core Porto consists of 2 layers “folders” Containers & Ship.
These layers can be created anywhere inside any framework of choice.
(Example: in Laravel or Rails they can be created in the app/ directory or in a new src/ directory at the root.)
![]()
Before diving deeper, let’s understand the different levels of code we will have in your code base:
Ship layer.Containers layer.The Containers layer (cargo containers) >> relies >> on the Ship layer (cargo ship) >> relies >> on the Framework (sea).
![]()
Porto is designed to scale with you! While most companies shift from Monolithic to Micro-Services (and most recently Serverless) as they scale up. Porto offers the flexibility to deflate your Monolithic into Micro-Services (or SOA) at any time with the least effort possible.
In Porto terms a Monolithic is equal to one cargo ship of Containers, while Micro Services is equal to multiple cargo ships of Containers. (Disregarding their sizes).
Porto offers the flexibility to start small with a single well organized Monolithic service and grow whenever you need, by extracting containers into multiple services as your team grows.
This is possible becuase Porto organizes your code into Containers, which are grouped into isolated Sections. A section can be later extracted out with all it’s related containers to be depolyed separatly as you scale.
As you can imagine operating two or more ships in the sea rather than a single one, will increase the cost of maintenance (two repositories, two CI pipelines,…) but also gives you flexibility, where each ship can run at different speed and direction. This technially translates to each service scaling differently based on the traffic it expect.
How Sections “Services” communicate together is completely up to the developers, even though Porto recomands using Events and/or Commands.
The Ship layer, contains the Parent “Base” classes (classes extended by every single component) and some Utility Code.
The Parent classes “Base classes” of the Ship layer gives full control over the Container’s Components (for example adding a function to the Base Model class, makes it available in every Model in your Containers).
The Ship layer, also plays an important role in separating the Application code from the Framework code. Which facilitates upgrading the Framework without affecting the Application code.
In Porto the Ship layer is very slim, it does NOT contain common reusable functionalities such as Authentication or Authorization, since all these functionalities are provided by Containers, to be replaced whenever needed. Giving the developers more flexibility.
The Ship layer, contains the following types of codes:
Note: All the Container’s Components MUST extend or inherit from the Ship layer (in particular the Parent’s folder).
When separating the Core to an external package, the Ship Parents should extend from the Core Parents (can be named Abstract, since most of the them supposed to be Abstract Classes). The Ship Parents holds your custom Application shared business logic, while the Core Parents (Abstracts) holds your framework common code, basically anything that is not business logic should be hidden from the actual Application being developed.
Porto manages the complexity of a problem by breaking it down to smaller manageable Containers.
The Containers layer is where the Application specific business logic lives (Application features/functionalities). You will spend 90% of your time at this layer.
A Container can be a feature, or can be a wrapper around a RESTful API resource, or anything else.
“In a TODO App, the ‘Task’, ‘User’ and ‘Calendar’ objects each would live in a different Container, were each has its own Routes, Controllers, Models, Exceptions, etc. And each Container is responsible for receiving requests and returning responses from whichever supported UI (Web, API..).”
It’s advised to use a Single Model per Container, however in some cases you may need more than a single Model and that’s totally fine. (Even if you have a single Model you could also have Values “AKA Value Objects” (Values are similar to Models but that do not get represented in the DB on their own tables but as data on the Models) these objects get built automatically after their data is fetched from the DB such as Price, Location, Time…)
Just keep in mind two Models means two Repositories, two Transformers, etc. Unless you want to use both Models always together, do split them into 2 Containers.
Note: if you have high dependecies between two containers by nature, than placing them in the same Section would make reusing them easier in other projects.
If you look at Apiato (the first project implementing Porto), you will notice that Authentication and Authorization are both features provided as Containers.
Container 1
├── Actions
├── Tasks
├── Models
└── UI
├── WEB
│ ├── Routes
│ ├── Controllers
│ └── Views
├── API
│ ├── Routes
│ ├── Controllers
│ └── Transformers
└── CLI
├── Routes
└── Commands
Container 2
├── Actions
├── Tasks
├── Models
└── UI
├── WEB
│ ├── Routes
│ ├── Controllers
│ └── Views
├── API
│ ├── Routes
│ ├── Controllers
│ └── Transformers
└── CLI
├── Routes
└── Commands
If you use Event based communcations between containers, you could use the same mechanism after spliting your code base into multi services.
Note: If you’re not familiar with separating your code into Modules/Domains, or for some reason you don’t prefer that approach. You can create your entire Application in a single Container. (Not recommended but absolutely possible).
Section are another very important aspect in the Porto architecture.
A Section is a group of related containers. It can be a service (micro or bigger), or a sub-system within the main system, or antyhing else.
Think of a Section as a rows of containers on a cargo ship. Well organized containers in rows, speeds up the loading and unloading of related containers for a specific customer.
The basic definition of a Section is a folder that contains related Containers. However the benifits are huge. (A section is equivalent to a bounded context from the Domain-driven design) Each section represents a portion of your system and is completely isolated from other sections.
A Section can be deployed separatly.
If you’re building a racing game like Need for Speed, you may have the following two sections: the Race Section and the Lobby Section, where each section contains a Car Container and a Car Model inside it, but with different properties and functions. In this example the Car Model of the Race section can contain the business logic for accelerating and controlling the car, while the Car Model of the Lobby Section contains the business logic for customizing the car (color, accessories..) before the race.
Sections allows separating large Model into smaller ones. And they can provide boundaries for different Models in your system.
If you prefer simplicity or you have only single team working on the project, you can have no Sections at all (where all Containers live in the containers folder) which means your project is a single section. In this case if the project grew quickly and you decided you need to start using sections, you can make a new project also with a single section, this is known as Micro-Services. In Micro-Services each section “project portion” live in its own project (repository) and they can communicate over the network usually using the HTTP protocol.
In a typical e-commerce application you can have the following sections: Inventory Section, Shipping Section, Order Section, Payment Section, Catalog Section and more…
As you can imagine each of these Sections can be a micro-service by itself. And can be extracted and deployed on its own server based on the traffic it receives.
In the Container layer there’s a set of Components “Classes” with predefined responsibilities.
Every single piece of code you write should live in a Component (class function). Porto defines a huge list of those Components for you, with a set guidelines to follow when using them, to keep the development process smooth.
Components ensures consistency and make your code easier to maintain as you already know where each piece of code should be found.
Every Container consists of a number of Components, in Porto the Components are split into two Types:
Main Components and Optional Components.
You must use these Components as they are essential for almost all types of Web Apps:
Routes - Controllers - Requests - Actions - Tasks - Models - Views - Transformers.
Views: should be used in case the App serves HTML pages.
Transformers: should be used in case the App serves JSON or XML data.
![]()
A basic API call scenario, navigating through the main components:
Endpoint in a Route file.Endpoint calls a Middleware to handle the Authentication.Endpoint calls its Controller function.Request injected in the Controller automatically applies the request validation & authorization rules.Controller calls an Action and pass each Request data to it.Action do the business logic, OR can call as many Tasks as needed to do the reusable subsets of the business logic.Tasks do a reusable subsets of the business logic (A Task can do a single portion of the main Action).Action prepares data to be returned to the Controller, some data can be collected from the Tasks.Controller builds the response using a View (or Transformer) and send it back to the User.Click on the arrows below to read about each component.
Routes are the first receivers of the HTTP requests.
The Routes are responsible for mapping all the incoming HTTP requests to their controller’s functions.
The Routes files contain Endpoints (URL patterns that identify the incoming request).
When an HTTP request hits your Application, the Endpoints match with the URL pattern and make the call to the corresponding Controller function.
Controllers are responsible for validating the request, serving the request data and building a response. Validation and response, happens in separate classes, but triggered from the Controller.
The Controllers concept is the same as in MVC (They are the C in MVC), but with limited and predefined responsibilities.
You may wonder why we need the Controller! when we can directly call the Action from the Route. The Controller layer helps making the Action reusable in multiple UI’s (Web & API), since it doesn’t build a response, and that reduces the amount of code duplication across different UI’s.
Here’s an example below:
W-R1 -> Controller W-C1 -> Action A1.A-R1 -> Controller A-C1 -> Action A1.As you can see in the example above the Action A1 was used by both routes W-R1 and A-R1, with the help of the Controllers layer that lives in each UI.
Requests mainly serve the user input in the application. And they are very useful to automatically apply the Validation and Authorization rules.
Requests are the best place to apply validations, since the validations rules will be related to every request. Requests can also check the Authorization, e.g. check if this user has access to this controller function. (Example: check if a specific user owns a product before deleting it, or check if this user is an admin to edit something).
Actions represent the Use Cases of the Application (the actions that can be taken by a User or a Software in the Application).
Actions CAN hold business logic or/and they orchestrate the Tasks to perform the business logic.
Actions take data structures as inputs, manipulates them according to the business rules internally or through some Tasks, then output a new data structures.
Actions SHOULD NOT care how the Data is gathered, or how it will be represented.
By just looking at the Actions folder of a Container, you can determine what Use Cases (features) your Container provides. And by looking at all the Actions you can tell what an Application can do.
run().run() can accept a Request Object in the parameter.The Tasks are the classes that hold the shared business logic between multiple Actions accross different Containers.
Every Task is responsible for a small part of the logic.
Tasks are optional, but in most cases you find yourself in need for them.
Example: if you have Action 1 that needs to find a record by its ID from the DB, then fires an Event. And you have an Action 2 that needs to find the same record by its ID, then makes a call to an external API. Since both actions are performing the “find a record by ID” logic, we can take that business logic and put it in it’s own class, that class is the Task. This Task is now reusable by both Actions and any other Action you might create in the future.
The rule is, whenever you see the possibility of reusing a piece of code from an Action, you should put that piece of code in a Task. Do not blindly create Tasks for everything, you can always start with writing all the business logic in an Action and only when you need to reuse it, create an a dedicated Task for it. (Refactoring is essential to adapt to the code growth).
run(). However, they can have more functions with explicit names if needed. Making the Task class replace the ugly concept of function flags. Example: the FindUserTask can have 2 functions byId and byEmail, all internal functions MUST call the run function. In this example the run can be called at the end of both funtions, after appending Criteria to the repository.FindUserByIdAction and FindUserByEmailAction where both Actions are calling the same Task” as well as it’s totally fine to have single Action FindUserAction making a decision to which Task it should call.The Models provide an abstraction for the data, they represent the data in the database. (They are the M in MVC).
Models are responsible for how the data should be handled. They make sure that data arrives properly into the backend store (e.g. Database).
Views contain the HTML served by your application.
Their main goal is to separate the application logic from the presentation logic. (They are the V in MVC).
Transformers (are the short name for Responses Transformers).
They are equivalent to Views but for JSON Responses. While Views takes data and represent it in HTML, Transformers takes data and represent it in JSON.
Transformers are classes responsible for transforming Models into Arrays.
Transformers takes a Model or a group of Models “Collection” and converts it to a formatted serializable Array.
Exceptions are also a form of output that should be expected (like an API exception) and well defined.
SubActions are designed to eliminate code duplication in Actions. Don’t get confused! SubActions do not replace Tasks.
While Tasks allows Actions to share a piece of functionality. SubActions allows Actions to share a sequence of Tasks.
The SubActions are created to solve a problem. The problem is: Sometimes you need to reuse a big chunk of business logic in multiple Actions. That chunk of code is already calling some Tasks. (Remember a Task SHOULD NOT call other Tasks) so how shall you reuse that chunk of code without creating a Task! The solution is create a SubAction.
Detailed Example: assuming an Action A1 is calling Task1, Task2 and Task3. And another Action A2 is calling Task2, Task3, Task4 and Task5. Notice both Actions are calling Tasks 2 and 3. To eliminate code duplication we can create a SubAction that contains all the common code between both Actions.
run().You can add these Components when you need them, based on your App needs, however some of them are highly recommended:
Tests - Events - Listeners - Commands - Migrations - Seeders - Factories - Middlewares - Repositories - Criteria - Policies - Service Providers - Contracts - Traits - Jobs - Values - Transporters - Mails - Notifications…
A Container with a list of Main and Optional Components.
Container
├── Actions
├── Tasks
├── Models
├── Values
├── Events
├── Listeners
├── Policies
├── Exceptions
├── Contracts
├── Traits
├── Jobs
├── Notifications
├── Providers
├── Configs
├── Mails
│ ├── Templates
├── Data
│ ├── Migrations
│ ├── Seeders
│ ├── Factories
│ ├── Criteria
│ ├── Repositories
│ ├── Validators
│ ├── Transporters
│ └── Rules
├── Tests
│ ├── Unit
│ └── Traits
└── UI
├── API
│ ├── Routes
│ ├── Controllers
│ ├── Requests
│ ├── Transformers
│ └── Tests
│ └── Functional
├── WEB
│ ├── Routes
│ ├── Controllers
│ ├── Requests
│ ├── Views
│ └── Tests
│ └── Acceptance
└── CLI
├── Routes
├── Commands
└── Tests
└── Functional
The benefits of using Porto.
In Porto, your application business logic lives in Containers. Porto Containers are similar in nature to the Modules (from the Modular architecture) and Domains (from the DDD architecture).
Containers can depend on other Containers, similar to how a layer can depend on other layers in a layered architecture.
Porto’s rules and guidelines minimizes and defines the dependecies directions between Containers, to avoid circular references between them.
And it allows the grouping of related Containers into sections, in order to reuse them together in different projects. (each Section contains a reusable portion of your application business logic).
In terms of dependency management, the developer is free to move each Container to its own repository or keep all Containers together under single repository.
Porto aim to reduce maintance cost by saving developers time. It’s structured in a way to insure code decoupling, and forces consistency which all contribute to its maintainability.
Having a single function per class to describe a functionality, makes adding and removing features an easy process.
Porto has a very organized code base and a zero code decoupling. In addition to clear development workflow with predefined data flow and dependencies directions. That all contributes to its scalability.
Extremely adhering to the single responsibility principle by having single function per class, results in having super slim classes, which leads to easier testability.
In Porto each component expect the same type of input and output, which makes testing, mocking and stabbing very simple.
The Porto structure itself makes writing automated tests a smooth process. As it has a tests folder at the root of each Container for contaning the unit tests of your Tasks.
And a tests folder in each UI folder for contaning the functional tests (for testing each UI’s separately).
The secret of making the testing and debugging easy, is not only in the organization of the tests and pre defined responsiblity of the components but also in the decoupling of your code.
With Porto you can easily accommodate future changes with the least amount of efforts.
Let’s assume you have a web app that serves HTML and recently you decided that you need to have a Mobile app, hence you need an API.
Porto has pluggable UI’s (WEB, API & CLI) and this allows writting the business logic of your application first, then implementing a UI to interact with your code.
This gives the flexibility to adding interfaces whenever needed and adapting to future changes, with the least effort possible.
it is all possible because the Actions are the central organizing principle “not the controller” which are shared across multiple UI’s. And the UI’s are separated from the application business logic and separated from each others within each Container.
Porto makes it super easy to locate any feature/functionality. And to understand what’s happening inside it.
That due to the usage of the domain expert language when naming the classes “components”. As well as the single function per class golden rule. Which allows you to find any Use Case (Action) in your code by just browsing the files.
Porto promises that you can find any feature implementation in less than 3 seconds! (example: if you are looking for where the user address is being validated - just go to the Address Container, open the list of Actions and search for ValidateUserAddressAction).
Porto’s takes future growth into consideration and it ensures your code remains maintainable no matter what the project size becomes.
It achieves this by its modular structure, separation of concerns and the organized coupling between the internal classes “Components”.
This allows modifications to be made without undesirable side effects.
Porto gives the ability to move quickly and easily.
It’s easy to make framework upgrades due to the complete separation between the App and the framework code through the Ship layer.
Feel free to list your implementation here.
List of projects implementing the Porto architecture.
Your feedback is important.
For feedbacks, questions, or suggestions? We are on Slack.
![]()
|
Mahmoud Zalt Twitter: @mahmoudz Site: zalt.me |
Become a Github Sponsor.
Direct donation via Paypal.
Become a Patreon.
MIT © Mahmoud Zalt
如题 apidoc 的 @apiGroup 值如果是中文的时候没办法进行分组。官方仓库提了好多这样的 issue,貌似韩文也不支持。
有人提了 pr,但是被拒绝了,不知道为什么。
可以临时根据这个 pr 修改文件来支持中文分组,node_modules/apidoc/lib/core/workers/api_group.js 文件中的:
group = group.replace(/^[^a-z]+|[^\w:.-]+/gi, '');
替换为:
group = encodeURI(group).replace(/^[^a-z]+|[^\w:.-]+/gi, '');
这样如果线上部署生成的话就不太方便了,可以在生成文档的脚本文件中添加一行替换的代码,在生成文档前强行替换:
sed -i 's/group = group.replace/group = encodeURI\(group\).replace/' node_modules/apidoc/lib/core/workers/api_group.js
进程组,就是一个或是多个进程的集合,每一个进程都有个标识「组ID(PGID)」,表示该进程属于哪个进程组。
进程:正在执行的程序,这个程序是在 bin/bash 进程里启动的。
进程启动之后(通过 execve 函数启动),它会继承一些属性比如说组ID,会话ID,同时也会继承父进程已经打开的文件描述符(伪终端里的):0/标准输入,1/标准输出,2/标准错误,通过 pts、ptmx 模拟出来的。
demo17.php
$pid = posix_getpid();
fprintf(STDOUT, "pid=%d,ppid=%d,pgid=%d,sid=%d\n",$pid,posix_getppid(),posix_getpgid($pid),posix_getsid($pid));
查看当前 bash 进程 PID
$ echo $$
1031235
另外一个 SSH 连接,追踪上一个 bash 进程
$ strace -f -s 65500 -o demo17.log -p 1031235
在 bash 进程 1031235 中,执行代码
$ php demo17.php
pid=1032568,ppid=1031235,pgid=1032568,sid=1031235
demo17.log
# bash 进程 clone 一个子进程 1032568
1031235 clone(child_stack=NULL, flags=CLONE_CHILD_CLEARTID|CLONE_CHILD_SETTID|SIGCHLD, child_tidptr=0x7f2c4847ba10) = 1032568
1032568 getpid() = 1032568
...
# 子进程将自己设置为组长进程
1031235 setpgid(1032568, 1032568) = 0
...
# 子进程执行 `demo17.php`
1032568 execve("/usr/bin/php", ["php", "-c", "/www/server/php/80/etc/php-cli.ini", "demo17.php"], 0x5558eda12830 /* 32 vars */) = 0
孤儿进程:指父进程先结束,但是子进程晚结束,这个时候子进程就是孤儿进程,它会被1号进程接管。
demo18.php
<?php
function showPid()
{
$pid = posix_getpid();
fprintf(STDOUT, "pid=%d,ppid=%d,pgid=%d,sid=%d\n",$pid,posix_getppid(),posix_getpgid($pid),posix_getsid($pid));
}
showPid(); // ppid 和下边两个子进程是不一样的
$pid = pcntl_fork(); // 该子进程的 ppid、pgid、sid是一样的
$pidMap = [];
if ($pid > 0) {
$pidMap[$pid] = $pid;
$pid = pcntl_fork(); // 该子进程的 ppid、pgid、sid是一样的
if ($pid > 0) {
$pidMap[$pid] = $pid;
}
}
showPid();
if ($pid > 0) {
$i = 0;
while (1) {
$pid = pcntl_waitpid(-1, $status);
if ($pid > 0) {
echo "子进程 $pid 结束了\n";
$i++;
}
unset($pidMap[$pid]);
if (empty($pidMap)) {
break;
}
}
}
运行结果:
$ php demo18.php
pid=678,ppid=28,pgid=678,sid=28
pid=679,ppid=678,pgid=678,sid=28
pid=678,ppid=28,pgid=678,sid=28
pid=680,ppid=678,pgid=678,sid=28
子进程 679 结束了
子进程 680 结束了
<?php
function showPid()
{
$pid = posix_getpid();
fprintf(STDOUT, "pid=%d,ppid=%d,pgid=%d,sid=%d\n",$pid,posix_getppid(),posix_getpgid($pid),posix_getsid($pid));
}
showPid(); // ppid 和下边两个子进程是不一样的
$pid = pcntl_fork(); // 该子进程的 ppid、pgid、sid是一样的
$pidMap = [];
if ($pid > 0) {
$pidMap[$pid] = $pid;
$pid = pcntl_fork(); // 该子进程的 ppid、pgid、sid是一样的
if ($pid > 0) {
$pidMap[$pid] = $pid;
} else {
// 设置子进程组id
$pid = posix_getpid();
posix_setpgid($pid, $pid);
// fork 一个子进程、观察组id变化
$pid = pcntl_fork();
if ($pid > 0) {
$pidMap[$pid] = $pid;
}
}
}
showPid();
if ($pid > 0) {
$i = 0;
while (1) {
$pid = pcntl_waitpid(-1, $status);
if ($pid > 0) {
echo "子进程 $pid 结束了\n";
$i++;
}
unset($pidMap[$pid]);
if (empty($pidMap)) {
break;
}
}
}
$ php demo18.php
pid=463,ppid=28,pgid=463,sid=28
pid=464,ppid=463,pgid=463,sid=28
pid=463,ppid=28,pgid=463,sid=28
pid=465,ppid=463,pgid=465,sid=28
pid=466,ppid=465,pgid=465,sid=28
子进程 466 结束了
子进程 464 结束了
能实现数据输入、输出的统称为终端。
物理终端:传统显示器、键盘,通过 VGA、HDMI、USB 等连接。
软件终端(虚拟终端/伪终端):通过 TCP/IP 协议实现的终端,能模拟出来一个实现「数据输入、输出」的终端,比如:ssh、telnet …
这篇博客介绍的比较详细:「转」彻底理解Linux的各种终端类型以及概念。
在linux中有物理终端,有虚拟终端(伪终端)。
sshd 服务会打开一个 [dev/ptmx],这个文件是一个伪终端主设备文件。
bin/bash 会打开一个 dev/pts(0,1…), 是一个伪终端从设备文件。
ptmx/ptsx 它们通过伪终端设备驱动程序模拟出输入和输出的功能。
bin/bash 进程就可以实现数据读取和数据写入。
ssh客户端 ——————> 远程服务器的一个进程 ——-> ssh客户端。
输入单元(ssh客户端)——–> /bin/bash进程————–> 输出单元(ssh客户端)。
bin/bash 启动之后,对终端数据的读取和写入就是通过 pts 实现的(能实现标准输入,标准输出)。
dev/pts0 0 1 2 标准输入,标准输出,标准错误。
通过 strace 命令查看sshd服务:
strace 前进程关系:
├─sshd,9408
│ └─sshd,2888142
│ └─bash,2888170
│ └─pstree,2889779 -ap
strace 中:
$strace -f -s 65500 -o sshd.log -p 9408 # strace 查看系统调用,进行一个新的 SSH 连接
strace: Process 9408 attached
strace: Process 2888330 attached
strace: Process 2888331 attached
strace: Process 2888336 attached
strace: Process 2888342 attached
strace: Process 2888343 attached
strace: Process 2888344 attached
strace: Process 2888345 attached
strace: Process 2888346 attached
strace: Process 2888347 attached
strace: Process 2888348 attached
strace: Process 2888349 attached
strace: Process 2888350 attached
strace: Process 2888351 attached
strace: Process 2888352 attached
strace: Process 2888353 attached
strace: Process 2888354 attached
strace: Process 2888355 attached
strace: Process 2888356 attached
strace: Process 2888357 attached # 新的SSH连接
strace: Process 2888358 attached
strace: Process 2888359 attached
strace: Process 2888360 attached
strace: Process 2888361 attached
strace: Process 2888362 attached
strace: Process 2888363 attached
strace: Process 2888364 attached
strace: Process 2888365 attached
strace: Process 2888382 attached
^Cstrace: Process 9408 detached # 终止信号
strace: Process 2888330 detached
strace: Process 2888357 detached
新的 SSH 连接以后的进程关系:
├─sshd,9408
│ ├─sshd,2888142
│ │ └─bash,2888170
│ └─sshd,2888330
│ └─bash,2888357 # 新的SSH连接
│ └─pstree,2889432 -ap
查看 sshd.log:
# select 是一个 socket 接口函数
9408 select(95, [3], NULL, NULL, NULL) = 1 (in [3])
# 接收客户端连接
9408 accept(3, {sa_family=AF_INET, sin_port=htons(22670), sin_addr=inet_addr("123.139.68.156")}, [128->16]) = 4
9408 fcntl(4, F_GETFL) = 0x2 (flags O_RDWR)
9408 pipe([5, 6]) = 0
9408 socketpair(AF_UNIX, SOCK_STREAM, 0, [7, 8]) = 0
# 创建 SSHD 子进程
9408 clone(child_stack=NULL, flags=CLONE_CHILD_CLEARTID|CLONE_CHILD_SETTID|SIGCHLD, child_tidptr=0x7f1fc4482210) = 2888330
9408 close(6) = 0
...
# 打开 ptmx 伪终端主设备文件
2888330 openat(AT_FDCWD, "/dev/ptmx", O_RDWR) = 9
2888330 statfs("/dev/pts", {f_type=DEVPTS_SUPER_MAGIC, f_bsize=4096, f_blocks=0, f_bfree=0, f_bavail=0, f_files=0, f_ffree=0, f_fsid={val=[0, 0]}, f_namelen=255,
...
# 创建 bash 子进程
2888330 clone(child_stack=NULL, flags=CLONE_CHILD_CLEARTID|CLONE_CHILD_SETTID|SIGCHLD, child_tidptr=0x7f1994e47210) = 2888357
2888357 set_robust_list(0x7f1994e47220, 24) = 0
...
2888357 close(11 <unfinished ...>
2888357 <... close resumed>) = 0
2888357 close(12 <unfinished ...>
2888357 <... close resumed>) = 0
2888357 close(9 <unfinished ...>
2888357 <... close resumed>) = 0
# 把自己设置为会话首进程
2888357 setsid( <unfinished ...>
2888357 openat(AT_FDCWD, "/dev/tty", O_RDWR|O_NOCTTY <unfinished ...>
2888357 <... openat resumed>) = -1 ENXIO (No such device or address)
2888357 setsid( <unfinished ...>
2888357 <... setsid resumed>) = 2888357
2888357 openat(AT_FDCWD, "/dev/tty", O_RDWR|O_NOCTTY <unfinished ...>
2888357 <... openat resumed>) = -1 ENXIO (No such device or address)
2888357 ioctl(10, TIOCSCTTY, 0 <unfinished ...>
2888357 <... ioctl resumed>) = 0
# 伪终端从设备文件
# 当 /bin/bash 进程打开这个文件时,就可以简单认为该进程已经连接了我们的输入(键盘)、输出单元(显示器)。
# 已经能实现数据的输入和输出,相当于连接了一个终端(这个终端是通过 [TCP/IP] 协议实现的)。
# Linux 内核(SSHD服务)模拟出一个终端:[0、1、2 标准输入、标准输出、标准错误]
2888357 openat(AT_FDCWD, "/dev/pts/1", O_RDWR <unfinished ...>
...
# 在终端输入 `ll` 的系统调用
# 说明伪终端通过 [TCP/IP] 传输
# 输入(键盘)
2888357 <... read resumed>"l", 1) = 1
# socket 监听
2888330 select(12, [4 5 11], [], NULL, NULL <unfinished ...>
2888357 select(1, [0], NULL, [0], {tv_sec=0, tv_usec=0}) = 1 (in [0], left {tv_sec=0, tv_usec=0})
2888357 pselect6(1, [0], NULL, NULL, NULL, {[], 8}) = 1 (in [0])
# 输入(键盘)
2888357 read(0, "l", 1) = 1
2888357 select(1, [0], NULL, [0], {tv_sec=0, tv_usec=0}) = 0 (Timeout)
# 输出(显示器)
2888357 write(2, "ll", 2) = 2
总结:
sshd 接收客户端连接之后,clone,fork 一个进程,同时打开伪终端主设备文件 /dev/ptmx;
再fork一个进程,同时启动 bin/bash(etc/passwd)进程,该进程会打开一个伪终端从设备 dev/pts;
伪终端能实现数据输入(键盘),还能实现数据输出(显示器),就是这个进程对应的键盘、显示器,键盘(0),显示器(1,2);
主从设备终端通过伪终端设备驱动程序进行通信;
ssh 客户端输入的数据,可以当作远程服务器的键盘输入的数据;
远程服务器的输出,通过 TCP/IP 协议传输到 ssh 客户端;
理解这些对:进程组,会话,守护进程的学习很重要。
为了防止走丢,做了全文转载。
原文出自:彻底理解Linux的各种终端类型以及概念
作者:dog250
每天使用Linux每天都要接触到Bash,使用Bash时似乎永远都让人摸不着头脑的概念就是终端,坐在这台运行着Linux的机器的显示器前面,这个显示器就是终端的输出,而插在机器上的USB键盘或者PS/2键盘就是终端的输入,看来这是一种最直白意义上关于终端的解释。
但是有的时候,机器上并没有看到显示器或者键盘接口,但是却有一个串口,想操作这台机器想必只能通过这个串口来进行了,这个时候,串口另一端的那台电脑的显示器键盘也叫做终端。除了上述两种意义的终端之外,我们使用的类似SecureCRT这种软件上运行的SSH,Telnet等也算是一种终端程序,只是说它是通过TCP/IP网络而不是通过串口与主机连接的。
现在可以给终端下一个非严格意义上的定义了,什么是终端?终端就是处理计算机主机输入输出的一套设备,它用来显示主机运算的输出,并且接受主机要求的输入,典型的终端包括显示器键盘套件,打印机打字机套件等。但想要彻底理解终端的概念,还是要从计算机发展历史的角度去寻根溯源。
最开始的时候,计算机有三间房屋那么大,确切地讲应该叫三间车间。如此的庞然大物有一个专门的操作台,就好像机床厂车间的操作台一样,或者说它像飞机驾驶舱的操作台更加合适,各种仪器仪表,操作员只需要在这里对这部机器发出指令,整部机器就开始为他的指令而运算,然后机器运算后的结果也会反馈到这里而不是其它地方,这里这个操作台就是最原始的终端。这里曾经是整部机器的控制中枢。
![]()
后来有了多用户多任务分时系统,不同的程序竟然可以“同时运行”了,为了让不同的程序分别独立地接受输入和处理输出,就需要多个不同的上述的操作台,当然了,坐在或者站在操作台前面的最好始终是同一个人,这样不同的人拥有不同的操作台处理不同的程序,这就进入了多终端时代,从这时起一直到现在,每一个终端都是和一个用户绑定的。为了保证这种绑定,于是就出现了登录,即通过一种叫做登录的动作,去唤起一个终端起来工作。为了支持多用户,终端从硬件分离了出来,终端成了一个软件概念,在一个硬件终端上成功登录后,便获得了一个软件终端。
可见,这个时代已经和三车间的时代不同了,终端不再只有一个,而是变成了多个,每一个登录成功的用户拥有一个可工作的软件终端来处理输入输出。
![]()
分久必合。
到了个人计算机时代,计算机和终端又成了一对一的关系。毕竟嘛,这时的计算机叫做个人计算机,并不是随便谁都能用的,计算机本身就是归属个人,所以根本没必要去支持什么多用户,或者至少是淡化了多用户和多终端的概念。我们都曾记得,当时买电脑的时候,都是一个主机配一个显示器和一套键盘鼠标,这种情况从上世纪80年代初一直持续到今天。不过近些年来当人们逐渐全面认识到计算机和终端的一对一关系后,一体机的市场就来了,既然你几乎不会(我当然知道有人会,但这里我说的是大多数人,程序员占比寥寥,程序员为了装X,是不会用一体机的,就连品牌机套装有时也不屑的)在同一主机上接多个显示器多套键盘,何必再那么麻烦,干脆把主机和显示器合在一起不就好了嘛。嗯,这个点子不错,循着这个路子,最终有了触屏一体机,连键盘都内置了。对比一下下图和三车间里的计算机时代,是不是很像呢?
![]()
但是好景不长。
合久必分。
一切似乎又回到了大型机时代。在大型机时代,一台机器是拥有多个终端的,那是五十年以前。今天,我们拥有了各种各样的小型设备,智能手机,平板电脑,智能手表….然而这些东西,其实仅仅只是一系列的终端而已!那么既然这些东西都成了终端,真正的计算机在哪儿?当然在各大机房(也是类似车间大小的那种房间)里了,只是现在不叫大型机了,而叫做云端,这种技术叫做云计算(似乎有点炒作概念的意思)。如果你不信你花了几千上万块的钱买来的设备仅仅是一个完成输入输出功能的终端,那么请断网试试,看看你的iPhone是不是变砖头了。可见,昂贵的是云提供的计算服务,而不是终端设备本身,我们把所谓的云看作是一台计算机,这幅图景是不是跟五十年前的非常像呢?
![]()
你有多久没有打开过家里的PC了,是不是很久了,但是日子也还过得去。但是你能忍受哪怕几个小时不登录微信吗?某种意义上,成为新的终端的不是这些个硬件设备,而是基于云计算技术的现代互联网服务的各类APP。
…
是不是又要分久必合了呢?早就有迹象了,从用QQ号可以登录微信,微博,内推网的时候就有迹象了。
好了,扯了这么多关于终端的发展,其实根本上也就一句话,能接受输入,能显示输出,就这就够了,不管到了什么时代,终端始终扮演着人机接口的角色,所谓Terminal,即机器的边缘!
只要能提供给计算机输入和输出功能,它就是终端,而与其所在的位置无关。我可以用ls命令列举五千公里以外的一台计算机上某个目录下的文件并且显示在我眼前的屏幕上,至于我的输入如何到达五千公里以外,这并不是我要关注的,也不是计算机要关注的,这显然只是一个通信方式问题。那么使用TCP/IP网络进行这类通信传输就是再显然不过的了。
这就是SSH使用的方法。我们知道,SSH是一个TCP/IP协议族的协议,而其上跑的却是一个远程登录后的终端流,这显然只是用TCP/IP构建了一条隧道,然后终端流通行于该隧道。除此之外,更简单的Telnet也不例外,也是通过一个TCP/IP隧道来封装承载远程登录的终端流。除却TCP/IP,如果我们执意使用卡车来运载我们的输入和输出,也完全是合适的,TCP/IP也好,卡车也好,它们只是通信手段,它们并非终端本身。
我们现在可以想象一下终端存在的形式都会有哪些。
大致就先说这几类吧。可见上述的三类中,前两类都是在本地就直接关联了物理设备的,比如VGA口啊,PS/2口啊,串口啊之类的,这种终端叫做物理终端,而第三类在本地则没有关联任何物理设备,注意,不要把物理网卡当成终端关联的物理设备,它只是隧道关联的物理设备,这里的物理网卡完全可以换成卡车,它们与终端并不直接相关,所以这类不直接关联物理设备的终端叫做伪终端。
既然知道了这些终端到底是怎么回事,理解余下来的那些术语就不在话下了。这些术语的存在并非是为了故意增加复杂性,而是因为工程上的东西必须要有可操作性,要可操作就必须至少有个名字来称呼,仅此而已。这跟我们中国的传统道,可道非常道;名,可名非常名是完全不同的。可谓现代数学,既要有名又要有道,而现代工程,则必须舍道而取名。
先看下Linux系统中管终端都叫做什么。
tty是最令人熟悉的了,在Linux中,/dev/ttyX代表的都是上述的物理终端,其中,/dev/tty1~/dev/tty63代表的是本地终端,也就是接到本机的键盘显示器可以操作的终端。换句话说,你往/dev/tty3里写个东西,它就会显示在显示器对应的终端。
为什么会有63个终端这么多呢?毕竟显示器只是一个单独的显示设备,键盘往往也只有一个,但Linux内核有能力知道现在该干什么,所以事实上Linux内核在初始化时会生成63个本地终端,通过键盘上的Fn-Alt-FX(X为1,2,3…)可以在这些终端之间切换,每切换到一个终端,该终端就是当前的焦点终端,比如说,你按下了Fn-Alt-F4组合键,那么此时第4个终端就是焦点终端,即/dev/tty4就是焦点终端设备。
![]()
谁是焦点终端会被内核记录为全局变量,这样只要有键盘输入,就会把输入的字符交给焦点终端。这里顺便提一下,对于串口而言,不存在焦点终端的概念,谁连了串口就是谁,而对于伪终端来讲,一般情况下client都是运行在GUI环境,对于Windows那是微软的事,对于Linux,则有X系统完成同样的事,在此略过,继续我们正在说的话题。
系统中有没有什么变量可以表示焦点终端呢?当然有了,那就是/dev/console,不管你在哪里往/dev/console里写东西,这些东西总会出现在系统当前的焦点终端上!
按照以他人为中心,我们解释了/dev/console其实就是一个全局变量,指代当前的焦点终端,如果当前的焦点是/dev/tty4,那么/dev/console指的就是/dev/tty4,当然这一切都是由内核来维护的。
那么系统中有没有一个叫做自己的全局变量呢?当然有,那就是/dev/tty,也就是说,无论你在哪个终端下工作,当你往/dev/tty里写东西的时候,它总是会马上出现在你的眼前。
/dev/tty1~/dev/tty63我们知道了它们是什么,/dev/tty表示自己,/dev/console表示焦点终端这些我们也知道了,那么串口终端如何表示呢?很简单,以ttyS
开头的就是串口连接的终端,比如ttyS1,ttyS2…
最后,解释一下伪终端。其实也很好解释,只要你理解TUN/TAP虚拟网卡的原理就行,它们如出一辙!类似Telnet,SSH不是没有实际的物理设备吗?简单,给它模拟一个不就得了?系统是分层的,执行流只管调用接口,并不管具体实现。
模拟一个虚拟的终端设备,实现它的write,read等回调即可。对于VGA连接的显示器而言,write其实就是将显存刷新,而对于伪终端而言,write其实是想将数据导入到一个用户态的程序中(不然又能去哪里呢?它下面又没有任何物理的东西),这简直跟很多VPN的原理非常类似。为此,Linux设计出一对虚拟终端设备,即/dev/ptmx和/dev/pts/X,这就跟TUN/TAP网卡的网卡与字符设备之前的对应关系一致。
简单来讲,当有ssh客户端连接后,sshd会fork一个进程,然后在子进程中打开一个叫做/dev/pts/1(或者2,3,4,5…)的设备,然后和sshd进程的/dev/ptmx配对,这样在ptmx与pts之间就构成了一条管道,数据可以顺利被导入到sshd,然后通过TCP/IP封装发往ssh client所在的机器。
为了帮助理解上述的文字,我特意作图一张,希望能解释清楚这些终端之间的关系以及弄明白它们的工作流程。为了让图画的更加紧凑,避免横向网络吧图拉的过长而不好看,我这里采用了环形解释法,类似Intel早先的Ring1,Ring2,Ring3,我把最内层视作硬件(比它更里面的还有叫做人的东西),中间层视作内核,最外层视作软件。
![]()
理解了图例,我上我的图,这是我昨晚画到很晚才完成的,希望能有宝贵的意见提出(图有点大,请单独查看):
![]()
/dev目录下的各种tty,ptmx,pts/X,console等等这些是令人混淆的根源,其实理解这些是有窍门的,记住它们只是操作某种终端设备的设备文件而已,这是UNIX风格的延续,这些设备文件对应的真实设备也就那么几种,比如显示器键盘套件,串口对面的超级终端,伪终端对面的SSH,Telnet等等。然后试着画出一个上面的图,基本就理清楚了。
本文的最后,我来简单说下关于getty和login相关的东西。
前面在讲终端发展历史的时候说到过,到了多终端时代,每一个终端必须绑定一个用户,只有登录成功的用户方可获得一个终端。因此当一个人站到一个终端面前并不意味着它就能在这个终端上操作计算机,他首先要做的就是登录。所谓的登录呢,就是输入用户名和密码,如果输入正确,则会给你一个Bash(或者别的Shell)让你操作计算机,如果输入不正确,则让你继续输入…
getty给了让你登录并且继续输入的机会!init进程不断调用getty,然后getty会发起login让你登录,当你输入正确的用户名和密码后,ttyXYZ就是你的了,如果你是用SSH进行的login,那么你将得到一个叫做/dev/pts/X,如果你是在显示器键盘登录,你将得到/dev/tttX(X取决于当前的焦点终端)。
所有这一切其实都是多终端以及多用户的产物,但归根结底其根源都在分时系统。在计算机最初被放在车间大小的屋子里的年代,可能把屋子的门禁做好以及将屋子外的鉴权系统做好显得比后来的多用户login更为重要,只有在后来,终端不再属于计算机了,终端与计算机分离了,用户也和终端分离了的时候,设计一套登录机制就显得尤为必要了,因为首先即便你把计算机锁在铁屋子里,只要终端在外面,那么计算机就毫无安全感可言,其次,你也不可能把终端全部锁在完全属于你控制的铁屋子里,特别是在TCP/IP出现以后,几乎所有的计算机都是互联互通的,这意味着任何一台计算机都可以作为其它任何一台另外的计算机的操作终端,任何外部的鉴权系统和物理保护在TCP/IP网络面前都堪比马其诺防线,看似固若金汤,实则百无一用。
![]()
信号集是指信号的集合。
主程序可以选择阻塞某些信号,被阻塞的信号集称为阻塞信号集。
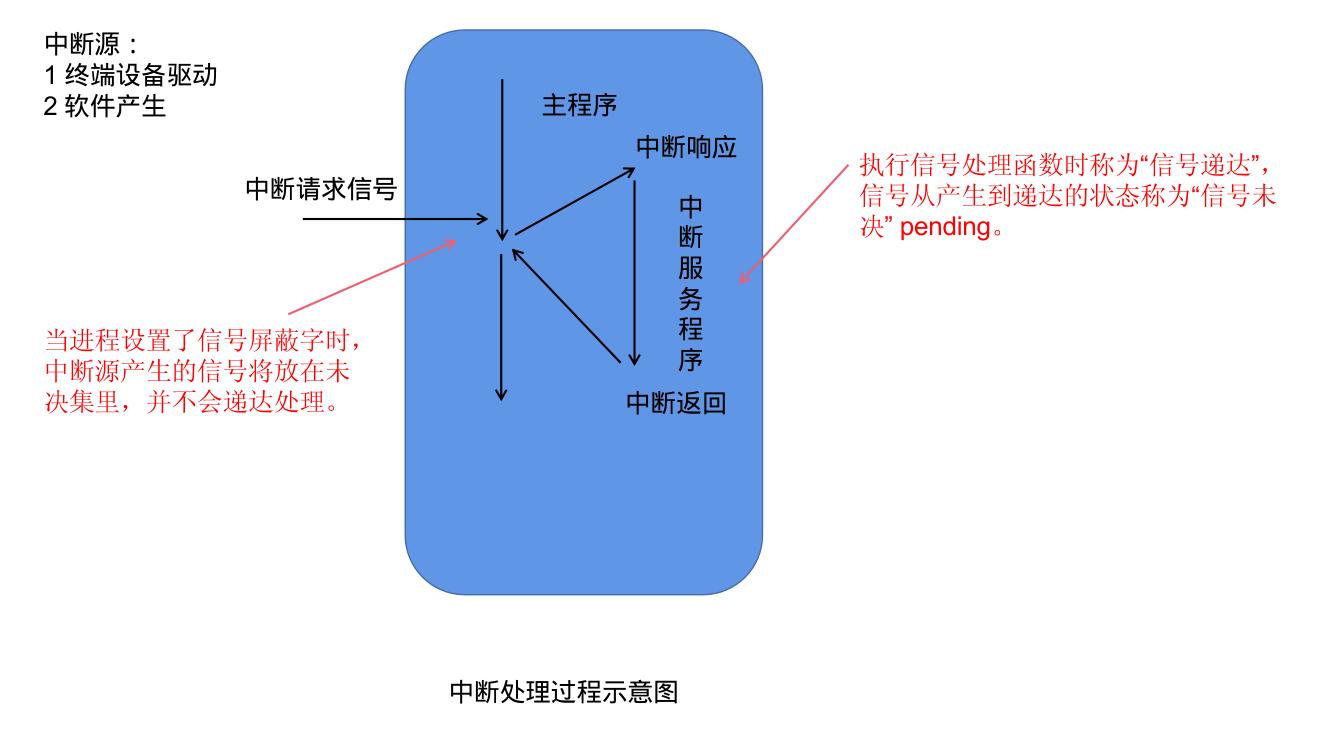
当进程阻塞了某个信号(通过 pcntl_sigpromask 来设置信号屏蔽字),如果在运行期间接收到了阻塞的信号时,这个信号的处理程序不会被执行,这个信号会放在被挂起的信号集里(信号未决集)。
PHP 没有实现这个函数。
examine pending signals.
sigpending() returns the set of signals that are pending for delivery to the calling thread (i.e., the signals which have been raised while blocked).
The mask of pending signals is returned in set.
pcntl_sigpromask 设置或检索阻塞信号,用来增加,删除或设置阻塞信号,具体行为 依赖于参数how。
pcntl_sigprocmask(int $how, array $set, array &$oldset = ?): bool
参数:
how:
设置 pcntl_sigprocmask()函数的行为。 可选值:
set:
信号列表。
oldset:
是一个输出参数,用来返回之前的阻塞信号列表数组。
返回值:
成功时返回 true, 或者在失败时返回 false。
示例:
<?php
pcntl_signal(SIGINT, function($signo){
fprintf(STDOUT, "pid=%d 接收到了信号:%d\n", getmypid(), $signo);
});
// 设置进程的信号屏蔽字|信号阻塞集
$sigset = [SIGINT, SIGUSR1];
pcntl_sigprocmask(SIG_BLOCK, $sigset);
$i = 10;
while ($i--){
pcntl_signal_dispatch();
fprintf(STDOUT, "pid=%d do something...\n", getmypid());
sleep(1);
if ($i == 5){
fprintf(STDOUT, "时间到,准备解除阻塞...\n");
//解除信号屏蔽
//$oldset 会返回之前阻塞的信号集|信号屏蔽字
pcntl_sigprocmask(SIG_UNBLOCK, [SIGINT,SIGUSR1], $oldset);
print_r($oldset);
}
}
$ php demo13.php
pid=2673 do something...
^C^Cpid=2673 do something...
# 按 ctrl + c 信号被屏蔽阻塞
^C^C^C^C^Cpid=2673 do something...
^C^C^Cpid=2673 do something...
pid=2673 do something...
时间到,准备解除阻塞...
Array
(
[0] => 2
[1] => 10
)
pid=2673 接收到了信号:2
pid=2673 do something...
^Cpid=2673 接收到了信号:2
# 解除阻塞后,按 ctrl + c 接收到信号并处理
pid=2673 do something...
^Cpid=2673 接收到了信号:2
pid=2673 do something...
^Cpid=2673 接收到了信号:2
pid=2673 do something...
^Cpid=2673 接收到了信号:2
pid=2673 do something...
指软件中断信号,简称软中断。
中断信号处理程序(信号处理函数,信号捕捉函数)完以后,就会返回继续执行主程序。
中断是用以提高计算机工作效率、增强计算机功能的一项重要技术。最初引入硬件中断,只是出于性能上的考量。如果计算机系统没有中断,则处理器与外部设备通信时,它必须在向该设备发出指令后进行忙等待(Busy waiting),反复轮询该设备是否完成了动作并返回结果。这就造成了大量处理器周期被浪费。
引入中断以后,当处理器发出设备请求后就可以立即返回以处理其他任务,而当设备完成动作后,发送中断信号给处理器,后者就可以再回过头获取处理结果。这样,在设备进行处理的周期内,处理器可以执行其他一些有意义的工作,而只付出一些很小的切换所引发的时间代价。后来被用于CPU外部与内部紧急事件的处理、机器故障的处理、时间控制等多个方面,并产生通过软件方式进入中断处理(软中断)的概念。
——中断
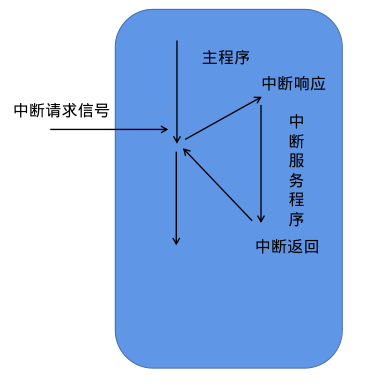
中断尽管可以提高计算机处理性能,但过于密集的中断请求/响应反而会影响系统性能。这类情形被称作中断风暴(interrupt storm)。
![]()
中断处理过程示意图
就是产生中断信号的单元。
对信号的处理。
中断服务程序运行完之后返回。
信号对进程的影响:
直接让进程终止
让进程停止
SIGCONT 可以唤醒进程到前台继续运行
demo11.php
<?php
echo posix_getpid();
while (1){
;
}
发送 SIGSTOP 让进程停止之后
[1] Killed php demo11.php
[2] Killed php demo11.php
[3]+ Stopped php demo11.php
$jobs
[1]+ Stopped php demo11.php
[1]、[2]、[3] 为任务编号
ctrl+z 它会让进程丢到后台去停止。
| 名称 | 功能描述 |
|---|---|
| SIGTSTP | 交互停止信号,终端挂起键 ctrl+z 终端驱动产生此信号 [终端停止符] 终止+core |
| SIGTERM | 可以被捕捉,让程序先清理一些工作再终止。[终止] |
| SIGSTOP | 作业控制信号,也是停止一个进程,跟 SIGTSTP 一样 |
| SIGQUIT | 退出键 CTRL+\ 终端驱动程序产生此信号,同时产生core文件 [终端退出符] |
| SIGINT | 中断键 delete/ ctrl+c [终端中断符] |
| SIGCHLD | 子进程终止时返回 |
| SIGUSR1 ,SIGUSR2 | 用户自定义信号 |
| SIGKILL SIGSTOP | 不能被捕捉及忽略的,主要用于让进程可靠的终止和停止 |
The Unix access rights flags setuid and setgid (short for “set user ID” and “set group ID”) allow users to run an executable with the file system permissions of the executable’s owner or group respectively and to change behaviour in directories. They are often used to allow users on a computer system to run programs with temporarily(暂时、临时) elevated(提高) privileges in order to perform a specific task. While the assumed user id or group id privileges provided are not always elevated, at a minimum they are specific.
The flags setuid and setgid are needed for tasks that require different privileges than what the user is normally granted, such as the ability to alter system files or databases to change their login password. Some of the tasks that require additional privileges may not immediately be obvious, though, such as the ping command, which must send and listen for control packets on a network interface.
——setuid
效果:
The setuid and setgid flags have different effects, depending on whether they are applied to a file, to a directory or binary executable or non binary executable file. The setuid and setgid flags have an effect only on binary executable files and not on scripts (e.g., Bash, Perl, Python).
set user ID,set group ID 设置用户ID,设置组ID。
设置了 setuid 的程序就是一个特权程序了,启动之后就是一个特权进程。
当特殊标志 s 这个字符出现在文件拥有者的 x 权限位的时候就叫 setuid,简称SUID,或SUID特殊权限。
例如:
$ ls -al /usr/bin/passwd
-rwsr-xr-x 1 root root 68208 7月 15 2021 /usr/bin/passwd
$ file /usr/bin/passwd
/usr/bin/passwd: setuid ELF 64-bit LSB shared object, x86-64, version 1 (SYSV), dynamically linked, interpreter /lib64/ld-linux-x86-64.so.2, BuildID[sha1]=6af93256cb810d90b2f96fc052b05b43b954f5b2, for GNU/Linux 3.2.0, stripped
一般,以 root 启动的程序都是超级进程,是一些重要的服务程序。
有时候我们经常是以普通用户来执行程序的,例如 www 用户。
但有时候普通进程需要访问一些特殊的资源,这时就需要提升权限来访问。
例如:linux 下 shadow 文件(包含系统用户密码信息),普通用户是无法查看,修改,删除的。但是 root 可以。
laradock@3a6c2da5a07b:/var/www$ cat /etc/shadow
cat: /etc/shadow: Permission denied
laradock@3a6c2da5a07b:/var/www$ ls -al /etc/shadow
-rw-r----- 1 root shadow 557 Jan 21 16:07 /etc/shadow
普通用户 laradock 可以通过 /usr/bin/passwd 这个 ELF 可执行文件修改 /etc/shadow 文件,因为普通用户拥有 /usr/bin/passwd 的可执行权限,并且 /usr/bin/passwd 是 SUID 特权程序,拥有 /etc/shadow 的读写权限。
在可执行文件的权限 x 位上设置 chmod u/g/o + s elf file
在编写特权进程时,提权访问资源之后一定要把权限改回来。
PHP 示例:
<?php
$file = "pwd.txt";
$uid = posix_getuid();
$euid = posix_geteuid();
fprintf(STDOUT, "uid=%d,euid=%d\n", $uid, $euid);
// 这样设置是不行的
// 为啥不行?
// Set the effective user ID of the current process. This is a privileged function and needs appropriate privileges (usually root) on the system to be able to perform this function.
posix_setuid($uid);
posix_seteuid($euid);
$uid = posix_getuid();
$euid = posix_geteuid();
fprintf(STDOUT, "uid=%d,euid=%d\n", $uid, $euid);
if (posix_access($file,POSIX_W_OK)){
fprintf(STDOUT,"我能修改...\n");
$fd = fopen($file,"a");
fwrite($fd,"php is the best ?\n");
fclose($fd);
}else{
fprintf(STDOUT,"我不能修改此文件...\n");
}
posix_access/access 检查用户是否对指定文件拥有某个权限。
提权前:
$ php demo10.php
uid=1000,euid=1000
uid=1000,euid=1000
我不能修改此文件...
$ cat pwd.txt
chmod u+s /usr/bin/php 提权后:
$ php demo10.php
uid=1000,euid=0
uid=0,euid=0
我能修改...
$ cat pwd.txt
php is the best ?