嘉兴游记-2023-7月
2023年7月7日 17:29
青春没有票价,嘉兴来了,南湖去了,小火车坐了,红船看了
![图片[1]-飞翔沫沫情](https://www.fxkjnj.com/wp-content/uploads/2023/07/dc1088f6442aa73383fb426a381257da_0e733665-15d8-4156-89d6-95eb7098b03e-1.jpg)
嘉兴有轨电车
![图片[2]-飞翔沫沫情](https://www.fxkjnj.com/wp-content/uploads/2023/07/dc1088f6442aa73383fb426a381257da_0fb3b1eb-492d-4765-8cb9-5c5d2602c89c-1.jpg)
小火车
![图片[3]-飞翔沫沫情](https://www.fxkjnj.com/wp-content/uploads/2023/07/dc1088f6442aa73383fb426a381257da_bc78283c-48ab-4807-b770-bae4f8e91a1f-1.jpg)
很环保纸质单程票
![图片[4]-飞翔沫沫情](https://www.fxkjnj.com/wp-content/uploads/2023/07/dc1088f6442aa73383fb426a381257da_70132497-7e07-4930-ae4a-e04ae85f6f99-1.jpg)
印象最深的NO1
![图片[5]-飞翔沫沫情](https://www.fxkjnj.com/wp-content/uploads/2023/07/dc1088f6442aa73383fb426a381257da_618cbbfa-f885-496f-9f58-60f8f9bb6ee0-1.jpg)
南湖入口
![图片[6]-飞翔沫沫情](https://www.fxkjnj.com/wp-content/uploads/2023/07/dc1088f6442aa73383fb426a381257da_17343b81-9cc9-4232-aa31-2b2de5c86974-1.jpg)
坐船上岛
![图片[7]-飞翔沫沫情](https://www.fxkjnj.com/wp-content/uploads/2023/07/dc1088f6442aa73383fb426a381257da_f854f899-14bd-42f2-8a68-08f928d82269-1.jpg)
![图片[8]-飞翔沫沫情](https://www.fxkjnj.com/wp-content/uploads/2023/07/dc1088f6442aa73383fb426a381257da_319d0b77-ef7a-4570-bae7-e0ec3967bf0c-1.jpg)
![图片[9]-飞翔沫沫情](https://www.fxkjnj.com/wp-content/uploads/2023/07/dc1088f6442aa73383fb426a381257da_237244da-bc06-477b-8b5d-ba2f3da0dba9-1.jpg)
![图片[10]-飞翔沫沫情](https://www.fxkjnj.com/wp-content/uploads/2023/07/dc1088f6442aa73383fb426a381257da_6afcb6f5-4251-4f48-adf4-fad62b333471-1.jpg)
烟雨楼
![图片[11]-飞翔沫沫情](https://www.fxkjnj.com/wp-content/uploads/2023/07/dc1088f6442aa73383fb426a381257da_bab26ccf-81a9-4cfc-bc60-ca917b0a882d-1.jpg)
![图片[12]-飞翔沫沫情](https://www.fxkjnj.com/wp-content/uploads/2023/07/dc1088f6442aa73383fb426a381257da_465fbac3-42ec-4d54-a84f-823fda1c271a-1.jpg)
红船
![图片[13]-飞翔沫沫情](https://www.fxkjnj.com/wp-content/uploads/2023/07/dc1088f6442aa73383fb426a381257da_358815e9-9679-4fc0-904d-6fd01e84fc4d-1.jpg)
红船
![图片[14]-飞翔沫沫情](https://www.fxkjnj.com/wp-content/uploads/2023/07/dc1088f6442aa73383fb426a381257da_193f2720-cb80-43af-a74b-4ead4f4998e6-1.jpg)
回程

实验环境:
1.查看当前服务器时区&列出时区并设置时区(如已是正确时区,请略过):
# timedatectl # timedatectl list-timezones # timedatectl set-timezone Asia/Shanghai
2.时间时区概念理解:
GMT、UTC、CST、DST
UTC:
整个地球分为二十四时区,每个时区都有自己的本地时间,在国际无线电通信场合,为了统一起见,使用一个统一的时间,称为通用协调时(UTC:Universal Time Coordinated)。
GMT:
格林威治标准时间 (Greenwich Mean Time)指位于英国伦敦郊区的皇家格林尼治天文台的标准时间,因为本初子午线被定义在通过那里的经线(UTC与GMT时间基本相同)。
CST:
中国标准时间 (China Standard Time)
GMT + 8 = UTC + 8 = CST
DST:
夏令时(Daylight Saving Time) 指在夏天太阳升起的比较早时,将时间拨快一小时,以提早日光的使用(中国不使用)。
2.使用 NTP 公共时间服务器池(NTP Public Pool Time Servers)http://www.pool.ntp.org 同步你的服务器时间。
查看是否安装:
# rpm -q ntp ntp-4.2.6p5-25.el7.centos.2.x86_64
如已安装请略过此步,否则请执行以下命令安装:
# yum install ntpdate ntp -y
修改NTP配置:
# vim /etc/ntp.conf
# For more information about this file, see the man pages
# ntp.conf(5), ntp_acc(5), ntp_auth(5), ntp_clock(5), ntp_misc(5), ntp_mon(5).
driftfile /var/lib/ntp/drift
#新增:日志目录.
logfile /var/log/ntpd.log
# Permit time synchronization with our time source, but do not
# permit the source to query or modify the service on this system.
restrict default nomodify notrap nopeer noquery
# Permit all access over the loopback interface. This could
# be tightened as well, but to do so would effect some of
# the administrative functions.
restrict 127.0.0.1
restrict ::1
#这一行的含义是授权所有机器可以从这台机器上查询和同步时间.
restrict 0.0.0.0 mask 0.0.0.0 nomodify notrap
# Hosts on local network are less restricted.
#restrict 192.168.1.0 mask 255.255.255.0 nomodify notrap
# Use public servers from the pool.ntp.org project.
# Please consider joining the pool (http://www.pool.ntp.org/join.html).
#server 0.centos.pool.ntp.org iburst
#server 1.centos.pool.ntp.org iburst
#server 2.centos.pool.ntp.org iburst
#server 3.centos.pool.ntp.org iburst
#新增:时间服务器列表.
server 0.cn.pool.ntp.org iburst
server 1.cn.pool.ntp.org iburst
server 2.cn.pool.ntp.org iburst
server 3.cn.pool.ntp.org iburst
server ntp1.aliyun.com iburst
server ntp2.aliyun.com iburst
server ntp3.aliyun.com iburst
server ntp4.aliyun.com iburst
server ntp5.aliyun.com iburst
server ntp6.aliyun.com iburst
server ntp7.aliyun.com iburst
#新增:当外部时间不可用时,使用本地时间193.168.151.6 为本机IP
#127.127.1.0 表示使用本机同步,必须是127.127.1.0!!!有坑
server 127.127.1.0
server 193.168.151.6 iburst
fudge 127.0.0.1 stratum 10
#broadcast 192.168.1.255 autokey # broadcast server
#broadcastclient # broadcast client
#broadcast 224.0.1.1 autokey # multicast server
#multicastclient 224.0.1.1 # multicast client
#manycastserver 239.255.254.254 # manycast server
#manycastclient 239.255.254.254 autokey # manycast client
#新增:允许上层时间服务器主动修改本机时间.
restrict 0.cn.pool.ntp.org nomodify notrap noquery
restrict 1.cn.pool.ntp.org nomodify notrap noquery
restrict 2.cn.pool.ntp.org nomodify notrap noquery
# Enable public key cryptography.
#crypto
includefile /etc/ntp/crypto/pw
# Key file containing the keys and key identifiers used when operating
# with symmetric key cryptography.
keys /etc/ntp/keys
# Specify the key identifiers which are trusted.
#trustedkey 4 8 42
# Specify the key identifier to use with the ntpdc utility.
#requestkey 8
# Specify the key identifier to use with the ntpq utility.
#controlkey 8
# Enable writing of statistics records.
#statistics clockstats cryptostats loopstats peerstats
# Disable the monitoring facility to prevent amplification attacks using ntpdc
# monlist command when default restrict does not include the noquery flag. See
# CVE-2013-5211 for more details.
# Note: Monitoring will not be disabled with the limited restriction flag.
disable monitor3.设置系统开机自启动:
# systemctl enable ntpd # systemctl enable ntpdate # systemctl is-enabled ntpd
在ntpd服务启动时,先使用ntpdate命令同步时间:
# ntpdate -u 1.cn.pool.ntp.org
原因之一:当服务端与客户端之间的时间误差过大时,此时修改时间可能对系统或应用带来不可预知问题,NTP会停止时间同步。若检查NTP启动后时间未同步时,应考虑可能是时间误差过大所致,此时需要先手动进行时间同步。
启动NTP服务器:
# systemctl start ntpdate
# systemctl start ntpd
4.加入防火墙:
# firewall-cmd --permanent --add-service=ntp # firewall-cmd --reload
5.查看ntp连接状态如果没有问题
# ss -tlunp | grep ntp # ntpq -p
将正确时间写入硬件【虚拟机,ECS 可以不用写入到硬件】
# hwclock -w
6.客户端:
以crontab任务计划同步时间(需安装ntpdate,每天24点更新同步时间):
[root@ecs-8611-0002 ~]# crontab -e
#ntp 时间同步
* */2 * * * /usr/sbin/ntpdate 193.168.151.6 > /dev/null 2>&1
#手动同步下,验证下时间是否同步过来
[root@ecs-8611-0002 ~]# /usr/sbin/ntpdate 193.168.151.6 > /dev/null 2>&1
[root@ecs-8611-0002 ~]# date
Wed May 12 10:31:36 CST 2021
一、编辑本地时间同步服务器地址
vim /etc/chrony.conf
server ntp1.aliyun.com iburst
server ntp2.aliyun.com iburst
server ntp3.aliyun.com iburst
server ntp4.aliyun.com iburst
server ntp5.aliyun.com iburst
server ntp6.aliyun.com iburst
server ntp7.aliyun.com iburst
systemctl start chronyd
systemctl enable chronyd
二、设置时区:
timedatectl set-timezone Asia/Shanghai
(date -s “YYYY-MM-DD HH:MM:SS”)手动设置时间
| 名称 | 版本 | 备注 |
|---|---|---|
| openeuler | 22.03 LTS | |
| fastdfs | 6.06 | |
| libfastcommon | 1.0.43 | libfastcommon是一个开源的C语言库,用于实现高性能的分布式文件系统和分布式存储系统 |
fastdfs 官网: https://github.com/happyfish100/fastdfs/tree/V6.06
官网可参考的安装手册:https://github.com/happyfish100/fastdfs/blob/V6.06/INSTALL
#fastdfs下载地址
https://github.com/happyfish100/fastdfs/archive/refs/tags/V6.06.zip
# libfastcommon下载地址
https://github.com/happyfish100/libfastcommon/archive/refs/tags/V1.0.43.zip[root@0003 ~]# yum -y install make gcc pcre pcre-devel zlib zlib-devel openssl openssl-devel kernel-headers#解压
unzip V1.0.43.zip
#并进入目录,执行 ./make.sh,执行./make.sh install#解压
unzip V6.06.zip
#并进入目录,执行./make.sh,执行./make.sh install
#安装成功后,根据模板创建3个配置文件
[root@0003 ~]#cd /etc/fdfs/
[root@0003 ~]# cp client.conf.sample client.conf && cp storage.conf.sample storage.conf && cp tracker.conf.sample tracker.conf
#创建fastdfs数据目录
[root@0003 ~]# mkdir -p /home/application/fastdfs/[root@0003 ~]# vim /etc/fdfs/tracker.conf
..............
disabled=false #配置文件是否失效
port=22122 #默认端口号
base_path= /home/application/fastdfs/ #日志及运行数据存储目录
..............添加自启动,并启动服务
[root@fastdfs 00]# chkconfig --add fdfs_trackerd
[root@0003 ~]# /etc/init.d/fdfs_trackerd start[root@0003 ~]# vim /etc/fdfs/storage.conf
..............
disabled=false #配置文件是否失效
group_name=group1 #组名,根据实际情况修改
port=23000 #设置storage的端口号,默认是23000
base_path = /home/application/fastdfs/ #设置storage数据文件和日志目录
store_path_count=1 #存储路径个数,需要和store_path个数匹配
store_path0 = /home/application/fastdfs/ #实际文件存储路径
tracker_server = 10.131.225.40:22122 #如果有多个tracker, tracker_server可以写多行
..............添加自启动,并启动服务
[root@fastdfs 00]# chkconfig --add fdfs_storaged
[root@0003 ~]# /etc/init.d/fdfs_storaged start[root@0003 ~]#vim /etc/fdfs/client.conf
- 只保留如下内容,默认的文件内容都可以清空
base_path=/tmp
tracker_server=10.131.225.40:22122创建一个测试文件并上传
[root@0003 ~]# echo "hello openeuler" > /tmp/test
#指定client.conf配置文件,并指定需要上传的文件
[root@0003 ~]# fdfs_upload_file /etc/fdfs/client.conf /tmp/test
返回值如 group1/M00/00/00/wKgBY2SaRKOABUlXAAAAEAGd5Pk2122913, 在 storage server1上相应目录中均能查看到该文件
具体的文件应该在: /home/application/fastdfs/data/00/00/wKgBY2SaRKOABUlXAAAAEAGd5Pk2122913![图片[1]-飞翔沫沫情](http://jpg.fxkjnj.com/picgo/202306281342535.png)
注意FastDFS中有预留空间的概念,在tracker.conf中设置,配置项为:reserved_storage_space,为磁盘总空间的20%,请酌情设置reserved_storage_space这个参数,配合监控系统来监控文件系统大小
jenkins 中因为使用了shared library 共享库,当每次去修改共享库中的配置的时候,job 在发布时,总会带出 changes 变更信息,怎么能够不输出共享库的git 变更信息,只打印业务代码 的变更记录
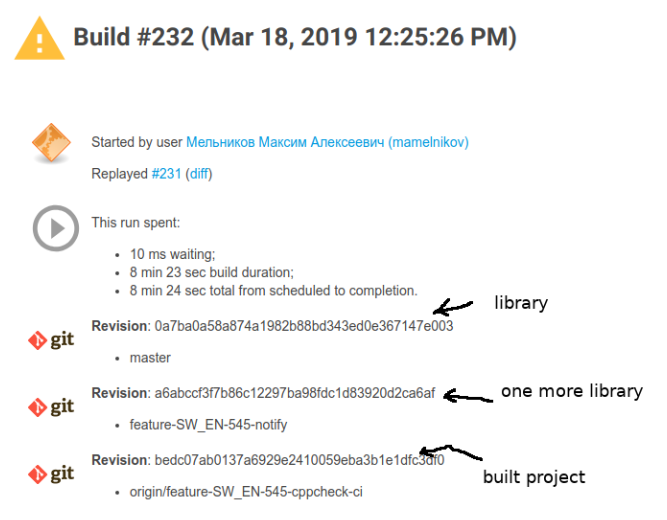
只需要在 jenkins 系统管理 / System 系统配置中 , 找到shared library 配置的地方,取消勾选 Include @Library changes in job recent changes 即可
openEuler默认普通用户是不能通过su切换到root用户的,
官方解释: su命令用于在不同帐户之间切换。为了增强系统安全性,有必要对su命令的使用权进行控制,只允许root和wheel群组的帐户使用su命令,限制其他帐户使用。
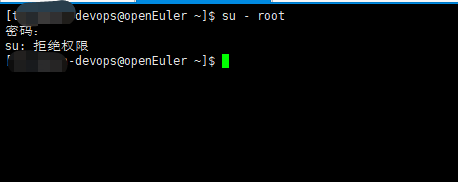
如果想普通用户 通过su切换到root,有以下两个解决办法
[root@localhost ~]# vim /etc/pam.d/su
#修改21行,将“auth required pam_wheel.so use_uid”注释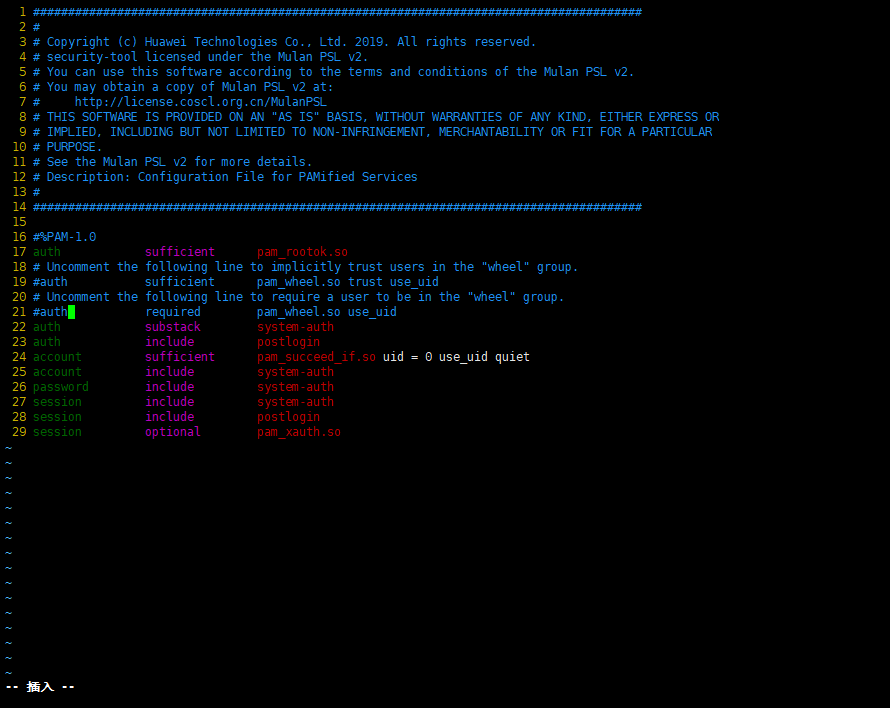
当我们在部署openeuler 系统的时候,系统会提示创建个普通用户,且这个用户可以su切换到root用户下,因为这个用户就是在whell用户组里的
#将devops用户加入wheel组
[root@localhost ~]# usermod -G wheel devops
[root@localhost ~]# id devops
uid=1000(devops) gid=1000(devops) groups=1000(devops),10(wheel)
nvm 介绍
nvm是一个用于管理多个 Node.js 版本的工具。它可以让你在同一台机器上安装和切换不同版本的 Node.js,而不会相互干扰。使用 nvm,你可以轻松地安装、切换和删除 Node.js 版本。你可以在同一台机器上同时安装多个版本的 Node.js,并且可以在项目中使用不同的 Node.js 版本,以确保项目的兼容性和稳定性。例如,你可以在一台机器上同时安装 Node.js 10.x、Node.js 12.x 和 Node.js 14.x 版本。然后,你可以使用 nvm 命令来切换到不同的版本,以便在不同的项目中使用不同的 Node.js 版本。
总之,nvm 是一个非常方便的工具,可以帮助你管理 Node.js 版本,提高开发效率。
[root@localhost ~]#yum install -y curl git[root@localhost ~]# wget https://github.com/nvm-sh/nvm/archive/refs/tags/v0.39.3.tar.gz
[root@localhost ~]# tar -xf nvm-0.39.3.tar
[root@localhost ~]# mv nvm-0.39.3 /root/.nvmroot@localhost ~]# echo ". ~/.nvm/nvm.sh" >> /etc/profile
root@localhost ~]# source /etc/profile如果输出了 nvm,则说明 nvm 已经正确安装。
[root@localhost ~]# command -v nvm
nvm[root@localhost ~]# nvm -v
0.39.3[root@localhost ~]# nvm list-remote[root@localhost ~]# nvm install 16.17.1
[root@localhost ~]# nvm install v14.18.0[root@localhost ~]# nvm ls
v14.18.0
v16.17.1[root@localhost ~]# nvm use v14.18.0
Now using node v14.18.0 (npm v6.14.15)
[root@localhost ~]# node -v
v14.18.0
[root@localhost ~]# npm -v
6.14.15
[root@localhost ~]# nvm use v16.17.1
Now using node v16.17.1 (npm v8.15.0)
[root@localhost ~]# node -v
v16.17.1
[root@localhost ~]# npm -v
8.15.0
yarn 介绍:
Yarn 是一个快速、可靠、安全的 JavaScript 包管理器,由 Facebook、Google、Exponent 和 Tilde 公司共同开发。它可以替代 npm,用于管理 JavaScript 包的依赖关系、版本号和安装。与 npm 相比,Yarn 具有以下优点:
总之,Yarn 是一个强大的 JavaScript 包管理器,可以帮助开发人员更快、更可靠、更安全地管理 JavaScript 包的依赖关系和版本号。
[root@localhost ~]# nvm use v14.18.0
Now using node v14.18.0 (npm v6.14.15) [root@localhost ~]# npm config set registry https://registry.npm.taobao.org
#通过这个命令进行测试
[root@localhost ~]# npm config get registry
https://registry.npm.taobao.org/
[root@jenkins-new ~]# npm install -g yarn
#全局修改
[root@jenkins-new ~]# yarn config set registry https://registry.npm.taobao.org/
#过这个命令进行测试
[root@jenkins-new ~]# yarn -v
1.22.15需要注意的是,每一个nodejs 版本 再安装yarn 的时候,都需要重复上面的操作,先切换到指定nodejs,再安装yarn
上面介绍过我们需要使用多个nodejs 环境来分别打包不同的项目
jenkinsfile 入口文件: 定义nodejs 的版本
map.put('npm_version','v16.17.1')//定义nodejs打包的版本,目前仅支持v14.18.0【默认】和v16.17.1jenkins 前端发布模板:
stage("打包编译"){
steps{
timeout(time: 5, unit: 'MINUTES') {
script {
tools.PrintMes("打包编译!nodejs版本为:${npm_version}",'green')
try {
sh '''
source /etc/profile && nvm use "${npm_version}" && yarn && yarn build:release"
'''
}catch (err) {
echo "编译失败,请检查"
exit 3
}
}
}
}
}效果: ![图片[1]-飞翔沫沫情](https://www.fxkjnj.com/wp-content/uploads/2023/05/0dd114047029f818adcfcdb728da2cda_1683469414258-h2c-6.png)