源码分析 Kubernetes 对 Pod IP 的管理
1. kube-controller-manager 对网段的管理 在 kube-controller-manager 有众多控制器,与 Pod IP 相关的是 NodeIpamController。 NodeIpamController 控制器主要是管理节点的 podcidr,当有新节点加入集群时,分配一个子网段给节点;当节点删除时,回收子网段。 每个节点的子网段不会重叠,每个节点都能够独立
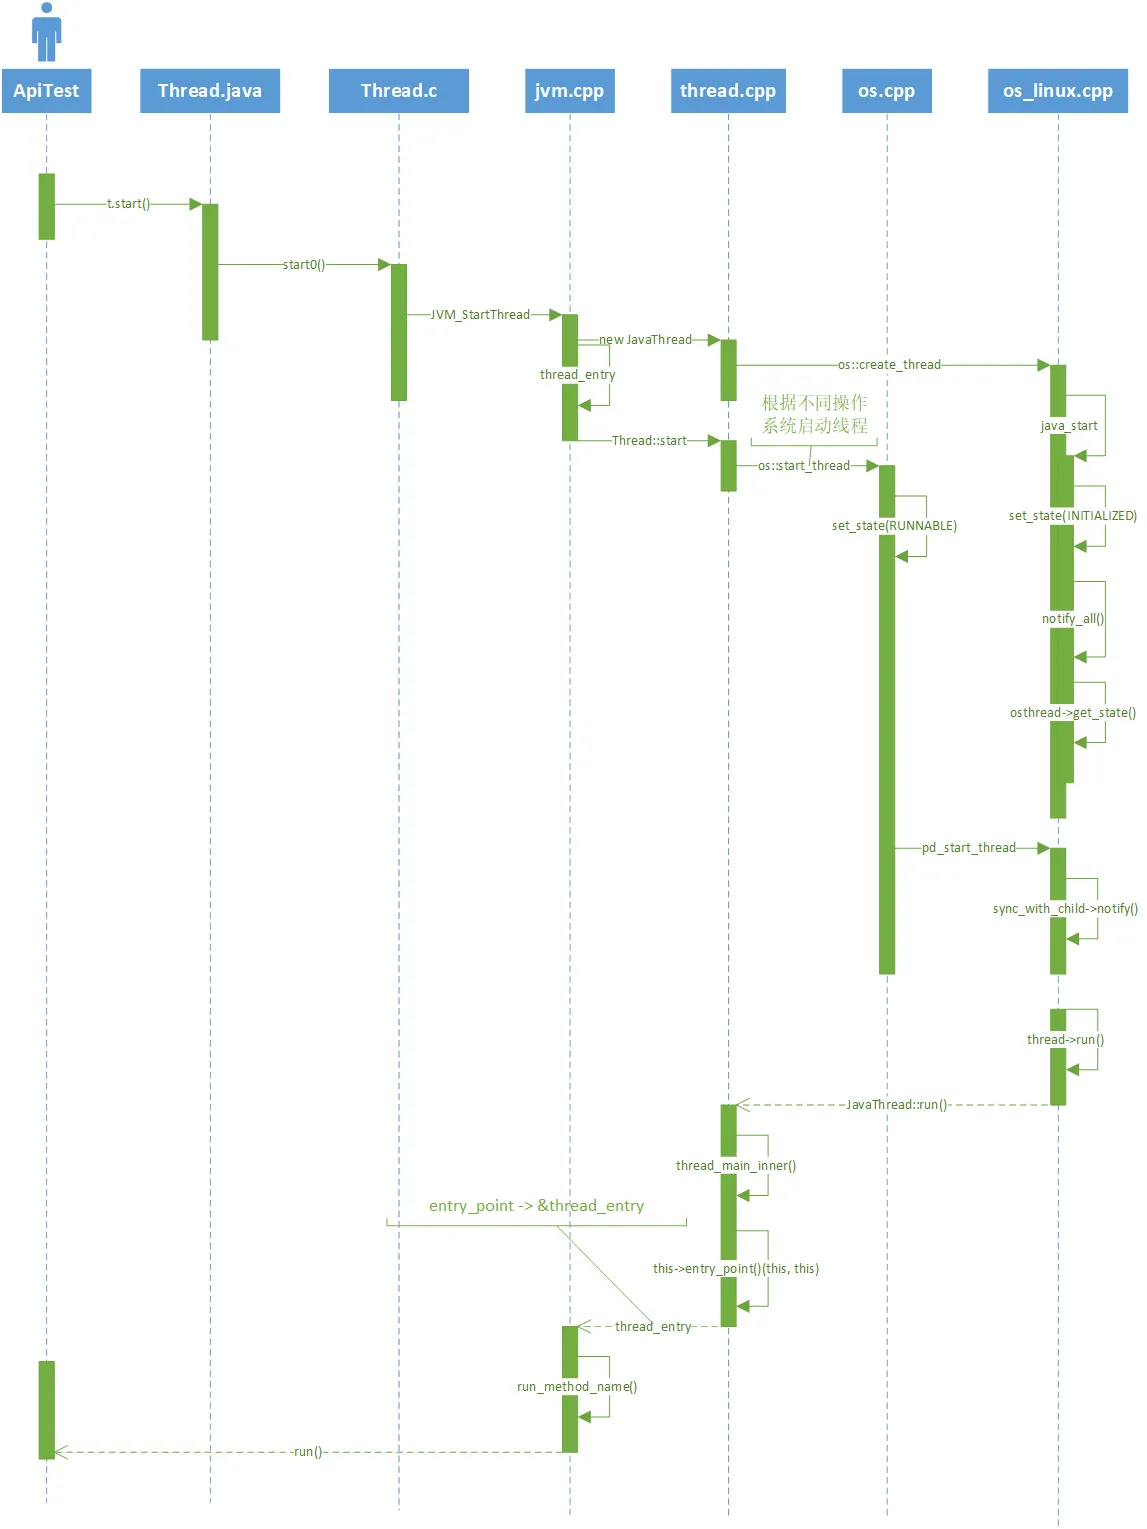
我们都知道,Android 中线程创建过程需要追溯到 Native 层面,最终是委托给一个 Linux 标准线程 pthread 来执行的,所以 Android 中线程状态本质上是 Native 线程的一种映射。Android 中运行的线程可以分为两种:一种是 attach 到虚拟机的,即虚拟机线程;另一种是没有 attach 到虚拟机的。今天我们就分别从源码层面来看看 Android 系统中 Java 和 Native 层线程的创建过程。
以下分析基于 Android 13 最新源码。
首先,我们需要知道的是:当我们通过 new 关键字创建一个 Thread 时其实并没有真正创建一个线程,只有调用 start 方法后才会去创建线程。先来看下 start 方法内部实现:
1
2
3
4
5
6
7
8
9
10
11
12
13
14
15
16
17
18
19
20
21
22
23
24
25
26
27
28
29
30
31
32
33
34
35
36
37
38
39
40
public synchronized void start() {
/**
* This method is not invoked for the main method thread or "system"
* group threads created/set up by the VM. Any new functionality added
* to this method in the future may have to also be added to the VM.
*
* A zero status value corresponds to state "NEW".
*/
// Android-changed: Replace unused threadStatus field with started field.
// The threadStatus field is unused on Android.
if (started)
throw new IllegalThreadStateException();
/* Notify the group that this thread is about to be started
* so that it can be added to the group's list of threads
* and the group's unstarted count can be decremented. */
group.add(this);
// Android-changed: Use field instead of local variable.
// It is necessary to remember the state of this across calls to this method so that it
// can throw an IllegalThreadStateException if this method is called on an already
// started thread.
started = false;
try {
// Android-changed: Use Android specific nativeCreate() method to create/start thread.
// start0();
nativeCreate(this, stackSize, daemon);
started = true;
} finally {
try {
if (!started) {
group.threadStartFailed(this);
}
} catch (Throwable ignore) {
/* do nothing. If start0 threw a Throwable then
it will be passed up the call stack */
}
}
}
可以看到,最终线程的创建和执行是在 nativeCreate 方法中,而它是个 native 方法,对应的实现在 /art/runtime/native/java_lang_Thread.cc 文件中,代码如下:
1
2
3
4
5
6
7
8
9
10
11
12
13
static void Thread_nativeCreate(JNIEnv* env, jclass, jobject java_thread, jlong stack_size,
jboolean daemon) {
// There are sections in the zygote that forbid thread creation.
Runtime* runtime = Runtime::Current();
if (runtime->IsZygote() && runtime->IsZygoteNoThreadSection()) {
jclass internal_error = env->FindClass("java/lang/InternalError");
CHECK(internal_error != nullptr);
env->ThrowNew(internal_error, "Cannot create threads in zygote");
return;
}
Thread::CreateNativeThread(env, java_thread, stack_size, daemon == JNI_TRUE);
}
继续跟踪到 /art/runtime/thread.cc:
1
2
3
4
5
6
7
8
9
10
11
12
13
14
15
16
17
18
19
20
21
22
23
24
25
26
27
28
29
30
31
32
33
34
void Thread::CreateNativeThread(JNIEnv* env, jobject java_peer, size_t stack_size, bool is_daemon) {
CHECK(java_peer != nullptr);
Thread* self = static_cast<JNIEnvExt*>(env)->GetSelf();
......
int pthread_create_result = 0;
if (child_jni_env_ext.get() != nullptr) {
pthread_t new_pthread;
pthread_attr_t attr;
child_thread->tlsPtr_.tmp_jni_env = child_jni_env_ext.get();
CHECK_PTHREAD_CALL(pthread_attr_init, (&attr), "new thread");
CHECK_PTHREAD_CALL(pthread_attr_setdetachstate, (&attr, PTHREAD_CREATE_DETACHED),
"PTHREAD_CREATE_DETACHED");
CHECK_PTHREAD_CALL(pthread_attr_setstacksize, (&attr, stack_size), stack_size);
pthread_create_result = pthread_create(&new_pthread,
&attr,
gUseUserfaultfd ? Thread::CreateCallbackWithUffdGc
: Thread::CreateCallback,
child_thread);
CHECK_PTHREAD_CALL(pthread_attr_destroy, (&attr), "new thread");
if (pthread_create_result == 0) {
// pthread_create started the new thread. The child is now responsible for managing the
// JNIEnvExt we created.
// Note: we can't check for tmp_jni_env == nullptr, as that would require synchronization
// between the threads.
child_jni_env_ext.release(); // NOLINT pthreads API.
return;
}
}
......
}
Thread::CreateNativeThread 方法实现比较多,过滤了一些代码,我们重点关注下里面调用了 pthread_create 方法:
bionic/libc/bionic/pthread_create.cpp
1
2
3
4
int pthread_create(pthread_t* thread_out, pthread_attr_t const* attr,
void* (*start_routine)(void*), void* arg) {
......
}
POSIX 线程(POSIX threads)又简称 Pthreads 是线程的 POSIX 标准,该标准定义了创建和操纵线程的一整套 API,在类 Unix 操作系统(Unix、Linux、Mac OS X等)中都使用 Pthreads 作为操作系统的线程,Windows操作系统也有其移植版 pthreads-win32。简而言之该标准定义内部 API 创建和操纵线程, Pthreads 定义了一套 C 程序语言类型、函数与常量,它以 pthread.h 头文件和一个线程库实现,所以在 Android Studio 使用时直接在 C/C++ 文件中 #include < pthread.h > 引入即可。
该函数是一个线程阻塞函数,调用方将一直等待到线程结束为止,当函数返回时,被等待线程的资源被收回。如果执行成功,将返回 0,如果失败则返回一个错误码。
该函数参数释义如下:
看到这里,基本代表 Java 层面的线程创建路径分析完成了,想更多了解关于 pthread 内容可自行查阅资料。此外,Android 中还有一种 native 线程,即 C/C++ 平台的 Thread 特供版。
刚刚我们分析了 Java 层面的 Thread 创建流程,下面来简单看下 Android Native 层中的 Thread 是如何创建的。首先我们需要关注一下 system/core/libutils/Threads.cpp 这个文件,里面是针对 Android 平台的 native 层如何创建一个线程的相关封装。
1
2
3
4
5
6
7
8
9
10
11
12
13
14
15
16
17
18
19
20
21
22
23
24
25
26
27
28
status_t Thread::run(const char* name, int32_t priority, size_t stack)
{
Mutex::Autolock _l(mLock);
if (mRunning) {
// thread already started
return INVALID_OPERATION;
}
...
mRunning = true;
bool res;
if (mCanCallJava) {
// 创建能调用Java代码的Native线程
res = createThreadEtc(_threadLoop,
this, name, priority, stack, &mThread);
} else {
// 创建只能调用C/C++代码的Native线程
res = androidCreateRawThreadEtc(_threadLoop,
this, name, priority, stack, &mThread);
}
if (res == false) {
return UNKNOWN_ERROR;
}
return NO_ERROR;
}
mCanCallJava 是在 Thread 对象创建时的构造参数,在构造函数中默认设置值为 true。
有关两种创建线程模式的方法实现分别在 createThreadEtc 和 androidCreateRawThreadEtc 中,下面来简单分析一下它们的实现链路。
本方法用于创建仅允许调用 C/C++ 代码的线程。
1
2
3
4
5
6
7
8
9
10
11
12
13
14
15
16
17
18
19
20
21
22
23
24
25
26
27
28
29
30
31
32
33
34
35
36
37
38
39
40
41
42
43
44
45
46
47
48
49
50
51
52
53
54
int androidCreateRawThreadEtc(android_thread_func_t entryFunction,
void *userData,
const char* threadName __android_unused,
int32_t threadPriority,
size_t threadStackSize,
android_thread_id_t *threadId)
{
pthread_attr_t attr;
pthread_attr_init(&attr);
pthread_attr_setdetachstate(&attr, PTHREAD_CREATE_DETACHED);
#if defined(__ANDROID__) /* valgrind is rejecting RT-priority create reqs */
if (threadPriority != PRIORITY_DEFAULT || threadName != NULL) {
// Now that the pthread_t has a method to find the associated
// android_thread_id_t (pid) from pthread_t, it would be possible to avoid
// this trampoline in some cases as the parent could set the properties
// for the child. However, there would be a race condition because the
// child becomes ready immediately, and it doesn't work for the name.
// prctl(PR_SET_NAME) only works for self; prctl(PR_SET_THREAD_NAME) was
// proposed but not yet accepted.
thread_data_t* t = new thread_data_t;
t->priority = threadPriority;
t->threadName = threadName ? strdup(threadName) : NULL;
t->entryFunction = entryFunction;
t->userData = userData;
entryFunction = (android_thread_func_t)&thread_data_t::trampoline;
userData = t;
}
#endif
if (threadStackSize) {
pthread_attr_setstacksize(&attr, threadStackSize);
}
errno = 0;
pthread_t thread;
int result = pthread_create(&thread, &attr,
(android_pthread_entry)entryFunction, userData);
pthread_attr_destroy(&attr);
if (result != 0) {
ALOGE("androidCreateRawThreadEtc failed (entry=%p, res=%d, %s)\n"
"(android threadPriority=%d)",
entryFunction, result, strerror(errno), threadPriority);
return 0;
}
// Note that *threadID is directly available to the parent only, as it is
// assigned after the child starts. Use memory barrier / lock if the child
// or other threads also need access.
if (threadId != nullptr) {
*threadId = (android_thread_id_t)thread; // XXX: this is not portable
}
return 1;
}
可以看到,上面代码首先做了一些线程对象的属性赋值,然后分配线程的栈空间,接着是通过 pthread 来创建一个线程,线程创建成功则返回 1。值得注意的是,这里的 entryFunction 其实就是之前代码中传进来的 _threadLoop 函数:
1
2
3
4
5
6
7
8
9
10
11
12
13
14
15
16
17
18
19
20
21
22
23
24
25
26
27
28
29
30
31
32
33
34
35
36
37
38
39
40
41
42
43
44
45
46
47
48
49
50
51
52
53
54
55
56
57
58
59
60
61
62
63
64
int Thread::_threadLoop(void* user)
{
Thread* const self = static_cast<Thread*>(user);
sp<Thread> strong(self->mHoldSelf);
wp<Thread> weak(strong);
self->mHoldSelf.clear();
#if defined(__ANDROID__)
// this is very useful for debugging with gdb
self->mTid = gettid();
#endif
bool first = true;
do {
bool result;
if (first) {
first = false;
self->mStatus = self->readyToRun();
result = (self->mStatus == OK);
if (result && !self->exitPending()) {
// Binder threads (and maybe others) rely on threadLoop
// running at least once after a successful ::readyToRun()
// (unless, of course, the thread has already been asked to exit
// at that point).
// This is because threads are essentially used like this:
// (new ThreadSubclass())->run();
// The caller therefore does not retain a strong reference to
// the thread and the thread would simply disappear after the
// successful ::readyToRun() call instead of entering the
// threadLoop at least once.
result = self->threadLoop();
}
} else {
result = self->threadLoop();
}
// establish a scope for mLock
{
Mutex::Autolock _l(self->mLock);
if (result == false || self->mExitPending) {
self->mExitPending = true;
self->mRunning = false;
// clear thread ID so that requestExitAndWait() does not exit if
// called by a new thread using the same thread ID as this one.
self->mThread = thread_id_t(-1);
// note that interested observers blocked in requestExitAndWait are
// awoken by broadcast, but blocked on mLock until break exits scope
self->mThreadExitedCondition.broadcast();
break;
}
}
// Release our strong reference, to let a chance to the thread
// to die a peaceful death.
strong.clear();
// And immediately, re-acquire a strong reference for the next loop
strong = weak.promote();
} while(strong != nullptr);
return 0;
}
通过上述代码不难发现:_threadLoop 内部会循环调用 Thread 对象的成员方法 threadLoop,该成员方法一般由派生类来自行实现。该线程将会在下面几种情况退出循环:
本方法用于创建允许调用 C/C++ 和 Java 代码的线程。
system/core/libutils/include/utils/AndroidThreads.h#createThreadEtc
1
2
3
4
5
6
7
8
9
10
11
// Create thread with lots of parameters
inline bool createThreadEtc(thread_func_t entryFunction,
void *userData,
const char* threadName = "android:unnamed_thread",
int32_t threadPriority = PRIORITY_DEFAULT,
size_t threadStackSize = 0,
thread_id_t *threadId = nullptr)
{
return androidCreateThreadEtc(entryFunction, userData, threadName,
threadPriority, threadStackSize, threadId) ? true : false;
}
继续跟踪 androidCreateThreadEtc 函数:
1
2
3
4
5
6
7
8
9
10
11
12
13
14
15
16
17
static android_create_thread_fn gCreateThreadFn = androidCreateRawThreadEtc;
int androidCreateThreadEtc(android_thread_func_t entryFunction,
void *userData,
const char* threadName,
int32_t threadPriority,
size_t threadStackSize,
android_thread_id_t *threadId)
{
return gCreateThreadFn(entryFunction, userData, threadName,
threadPriority, threadStackSize, threadId);
}
void androidSetCreateThreadFunc(android_create_thread_fn func)
{
gCreateThreadFn = func;
}
看到这里可以发现继续调用了 gCreateThreadFn 函数,而该函数会被调用方在其他地方赋值代理掉,所以我们需要找到调用 androidSetCreateThreadFunc 函数的地方,最终锁定在了 frameworks/base/core/jni/AndroidRuntime.cpp 这个文件:
1
2
3
4
5
6
7
8
9
10
11
12
13
14
15
16
17
18
19
20
21
22
23
24
25
26
27
28
29
30
31
32
33
/*
* Register android native functions with the VM.
*/
/*static*/ int AndroidRuntime::startReg(JNIEnv* env)
{
ATRACE_NAME("RegisterAndroidNatives");
/*
* This hook causes all future threads created in this process to be
* attached to the JavaVM. (This needs to go away in favor of JNI
* Attach calls.)
*/
androidSetCreateThreadFunc((android_create_thread_fn) javaCreateThreadEtc);
ALOGV("--- registering native functions ---\n");
/*
* Every "register" function calls one or more things that return
* a local reference (e.g. FindClass). Because we haven't really
* started the VM yet, they're all getting stored in the base frame
* and never released. Use Push/Pop to manage the storage.
*/
env->PushLocalFrame(200);
if (register_jni_procs(gRegJNI, NELEM(gRegJNI), env) < 0) {
env->PopLocalFrame(NULL);
return -1;
}
env->PopLocalFrame(NULL);
//createJavaThread("fubar", quickTest, (void*) "hello");
return 0;
}
由此看来,Android 系统会在向虚拟机中注册 native 方法时将 gCreateThreadFn 指定向 javaCreateThreadEtc 这个函数。那么我们就来看下 javaCreateThreadEtc 内部实现如何:
frameworks/base/core/jni/AndroidRuntime.cpp#javaCreateThreadEtc
1
2
3
4
5
6
7
8
9
10
11
12
13
14
15
16
17
18
19
20
21
22
23
24
25
26
27
28
/*
* This is invoked from androidCreateThreadEtc() via the callback
* set with androidSetCreateThreadFunc().
*
* We need to create the new thread in such a way that it gets hooked
* into the VM before it really starts executing.
*/
/*static*/ int AndroidRuntime::javaCreateThreadEtc(
android_thread_func_t entryFunction,
void* userData,
const char* threadName,
int32_t threadPriority,
size_t threadStackSize,
android_thread_id_t* threadId)
{
void** args = (void**) malloc(3 * sizeof(void*)); // javaThreadShell must free
int result;
LOG_ALWAYS_FATAL_IF(threadName == nullptr, "threadName not provided to javaCreateThreadEtc");
args[0] = (void*) entryFunction;
args[1] = userData;
args[2] = (void*) strdup(threadName); // javaThreadShell must free
result = androidCreateRawThreadEtc(AndroidRuntime::javaThreadShell, args,
threadName, threadPriority, threadStackSize, threadId);
return result;
}
根据官方给出的注释可以知道:javaCreateThreadEtc 函数从 androidCreateThreadEtc 中通过 androidSetCreateThreadFunc 设置的回调来进行调用的,即在线程真正开始执行之前被 Hook 到虚拟机中。我们接着来看下真正实现的 androidCreateRawThreadEtc 函数:
1
2
3
4
5
6
7
8
9
10
11
12
13
14
15
16
17
18
19
20
21
22
23
24
25
26
27
28
29
30
31
32
33
34
35
36
37
38
39
40
41
42
43
44
45
46
47
48
49
50
51
52
53
54
int androidCreateRawThreadEtc(android_thread_func_t entryFunction,
void *userData,
const char* threadName __android_unused,
int32_t threadPriority,
size_t threadStackSize,
android_thread_id_t *threadId)
{
pthread_attr_t attr;
pthread_attr_init(&attr);
pthread_attr_setdetachstate(&attr, PTHREAD_CREATE_DETACHED);
#if defined(__ANDROID__) /* valgrind is rejecting RT-priority create reqs */
if (threadPriority != PRIORITY_DEFAULT || threadName != NULL) {
// Now that the pthread_t has a method to find the associated
// android_thread_id_t (pid) from pthread_t, it would be possible to avoid
// this trampoline in some cases as the parent could set the properties
// for the child. However, there would be a race condition because the
// child becomes ready immediately, and it doesn't work for the name.
// prctl(PR_SET_NAME) only works for self; prctl(PR_SET_THREAD_NAME) was
// proposed but not yet accepted.
thread_data_t* t = new thread_data_t;
t->priority = threadPriority;
t->threadName = threadName ? strdup(threadName) : NULL;
t->entryFunction = entryFunction;
t->userData = userData;
entryFunction = (android_thread_func_t)&thread_data_t::trampoline;
userData = t;
}
#endif
if (threadStackSize) {
pthread_attr_setstacksize(&attr, threadStackSize);
}
errno = 0;
pthread_t thread;
int result = pthread_create(&thread, &attr,
(android_pthread_entry)entryFunction, userData);
pthread_attr_destroy(&attr);
if (result != 0) {
ALOGE("androidCreateRawThreadEtc failed (entry=%p, res=%d, %s)\n"
"(android threadPriority=%d)",
entryFunction, result, strerror(errno), threadPriority);
return 0;
}
// Note that *threadID is directly available to the parent only, as it is
// assigned after the child starts. Use memory barrier / lock if the child
// or other threads also need access.
if (threadId != nullptr) {
*threadId = (android_thread_id_t)thread; // XXX: this is not portable
}
return 1;
}
该函数实现在 androidCreateRawThreadEtc 章节就已经分析过了,只不过这里的 entryFunction 传过来的是 AndroidRuntime::javaThreadShell,我们来看下它内部如何实现的:
1
2
3
4
5
6
7
8
9
10
11
12
13
14
15
16
17
18
19
20
21
22
23
24
25
26
/*
* When starting a native thread that will be visible from the VM, we
* bounce through this to get the right attach/detach action.
* Note that this function calls free(args)
*/
/*static*/ int AndroidRuntime::javaThreadShell(void* args) {
void* start = ((void**)args)[0];
void* userData = ((void **)args)[1];
char* name = (char*) ((void **)args)[2]; // we own this storage
free(args);
JNIEnv* env;
int result;
/* hook us into the VM */
if (javaAttachThread(name, &env) != JNI_OK)
return -1;
/* start the thread running */
result = (*(android_thread_func_t)start)(userData);
/* unhook us */
javaDetachThread();
free(name);
return result;
}
javaThreadShell 函数比较重要,综合上下文不难发现,代码中的局部变量 start 代表的是 _threadLoop,userData 代表 Thread 对象,而 name 指向线程的名称。接着继续调用了 javaAttachThread 函数,用于将线程 hook 到当前进程的虚拟机中,进而执行 Java 代码。紧接着继续执行线程自身的逻辑,即调用成员函数 threadLoop;线程执行完毕后调用了 javaDetachThread 函数用于将线程从虚拟机中剥离。下面重点看下 javaAttachThread 内部是如何将线程 hook 至虚拟机的:
1
2
3
4
5
6
7
8
9
10
11
12
13
14
15
16
17
18
19
20
21
22
23
24
25
/*
* Makes the current thread visible to the VM.
*
* The JNIEnv pointer returned is only valid for the current thread, and
* thus must be tucked into thread-local storage.
*/
static int javaAttachThread(const char* threadName, JNIEnv** pEnv)
{
JavaVMAttachArgs args;
JavaVM* vm;
jint result;
vm = AndroidRuntime::getJavaVM();
assert(vm != NULL);
args.version = JNI_VERSION_1_4;
args.name = (char*) threadName;
args.group = NULL;
result = vm->AttachCurrentThread(pEnv, (void*) &args);
if (result != JNI_OK)
ALOGI("NOTE: attach of thread '%s' failed\n", threadName);
return result;
}
可以看见 javaAttachThread 中又调用了 AttachCurrentThread 函数,该函数可以将 native 线程附加到进程的 VM 中,详细参见官方 JNI 文档:JNI 提示
接着可以在 runtime 中找到 CheckAttachThread 实现:
1
2
3
4
5
6
7
8
9
10
11
12
13
14
15
16
17
18
19
20
21
22
// Check whether the current thread is attached. This is usually required
// to be the first check, as ScopedCheck needs a ScopedObjectAccess for
// checking heap values (and that will fail with unattached threads).
bool CheckAttachedThread(const char* function_name) {
Thread* self = Thread::Current();
if (UNLIKELY(self == nullptr)) {
// Need to attach this thread for a proper abort to work. We prefer this
// to get reasonable stacks and environment, rather than relying on
// tombstoned.
JNIEnv* env;
Runtime::Current()->GetJavaVM()->AttachCurrentThread(&env, /* thr_args= */ nullptr);
std::string tmp = android::base::StringPrintf(
"a thread (tid %" PRId64 " is making JNI calls without being attached",
static_cast<int64_t>(GetTid()));
Runtime::Current()->GetJavaVM()->JniAbort(function_name, tmp.c_str());
CHECK_NE(Runtime::Current()->GetJavaVM()->DetachCurrentThread(), JNI_ERR);
return false;
}
return true;
}
好吧,里面又调用了 GetJavaVM()-> AttachCurrentThread,看来我们还得继续跟下去,不过为了节省中间若干个类文件跳转环节,这里直接指出最终目的地在 Runtime::AttachCurrentThread 函数里面:
1
2
3
4
5
6
7
8
9
10
11
12
13
14
15
bool Runtime::AttachCurrentThread(const char* thread_name, bool as_daemon, jobject thread_group,
bool create_peer, bool should_run_callbacks) {
ScopedTrace trace(__FUNCTION__);
Thread* self = Thread::Attach(thread_name,
as_daemon,
thread_group,
create_peer,
should_run_callbacks);
// Run ThreadGroup.add to notify the group that this thread is now started.
if (self != nullptr && create_peer && !IsAotCompiler()) {
ScopedObjectAccess soa(self);
self->NotifyThreadGroup(soa, thread_group);
}
return self != nullptr;
}
这里其实就是将线程在 JavaVM 层面包装成一个 VM 上的线程再返回给 self。接下来就不继续往下深究了,篇幅有限,本文先讲到这里,里面还涉及到很多 JavaVM 相关的细节及原理将在后续文章中做一个补充。
顺带提一嘴,Android SDK 中的 Thread 与 JDK 中的 java.lang.Thread 实际上是有区别的,虽然 Android 也使用 Java 语言开发,但Android 基于平台特殊性对 JDK 进行了一些删减和改造。我们都知道 Java 是具有跨平台特性的,同一套代码它完全可以在 Windows、Linux 等操作系统上正常运作,但其实内部的线程创建等细节是基于 OS 的特性进行各自实现的:
想了解更多关于 Java 线程的启动过程可以参考此文。
我们通过在 Java 层面创建线程的时候,VM 会包装成一个 VM 的 Thread,然后启动 pthread,再调用 run 方法,但我们通过 pthread 独立创建的线程,是没有和 VM 里面的线程对象建立关联的,VM 压根不知道它的存在。但是如果该线程想要访问 Java代码,这就得需 VM 帮忙,故而需要将 native 层自己创建的线程包装成一个 VM 层面的 Thread 对象,然后添加到 VM 的 thread 集合中去,如此一来,Android 的虚拟机就可以感知到 native 中这个线程对象的存在了。
laravel 源码分析具体注释见 https://github.com/FX-Max/source-analysis-laravel
队列 (Queue) 是 laravel 中比较常用的一个功能,队列的目的是将耗时的任务延时处理,比如发送邮件,从而大幅度缩短 Web 请求和响应的时间。本文我们就来分析下队列创建和执行的源码。
本文笔者基于 laravel 5.8.* 版本
先通过命令创建一个 Job 类,成功之后会创建如下文件 laravel-src/laravel/app/Jobs/DemoJob.php。
1 | > php artisan make:job DemoJob |
下面我们来分析一下 Job 类的具体生成过程。
执行 php artisan make:job DemoJob 后,会触发调用如下方法。
laravel-src/laravel/vendor/laravel/framework/src/Illuminate/Foundation/Providers/ArtisanServiceProvider.php
1 | /** |
接着我们来看下 JobMakeCommand 这个类,这个类里面没有过多的处理逻辑,处理方法在其父类中。
1 | class JobMakeCommand extends GeneratorCommand |
我们直接看父类中的处理方法,GeneratorCommand->handle(),以下是该方法中的主要方法。
1 | public function handle() |
方法就是通过目录和文件,创建对应的类文件,至于新文件的内容,都是基于已经设置好的模板来创建的,具体的内容在 buildClass($name) 方法中。
1 | protected function buildClass($name) |
获取模板文件
1 | protected function getStub() |
job.stub
1 | <?php |
job-queued.stub
1 | <?php |
下面看一下前面我们创建的一个 Job 类,DemoJob.php,就是来源于模板 job-queued.stub。
1 | <?php |
至此,我们已经大致明白了队列任务类是如何创建的了。下面我们来分析下其是如何生效运行的。
任务类创建后,我们就可以在需要的地方进行任务的分发,常见的方法如下:
1 | DemoJob::dispatch(); // 任务分发 |
下面先以 dispatch() 为例分析下分发过程。
1 | trait Dispatchable |
1 | class PendingDispatch |
重点是 app(Dispatcher::class)->dispatch($this->job) 这部分。
我们先来分析下前部分 app(Dispatcher::class),它是在 laravel 框架中自带的 BusServiceProvider 中向 $app 中注入的。
1 | class BusServiceProvider extends ServiceProvider implements DeferrableProvider |
看一下 Dispatcher 的构造方法,至此,我们已经知道前半部分 app(Dispatcher::class) 是如何来的了。
1 | class Dispatcher implements QueueingDispatcher |
BusServiceProvider 中注册了 Dispatcher::class ,然后 app(Dispatcher::class)->dispatch($this->job) 调用的即是 Dispatcher->dispatch()。
1 | public function dispatchToQueue($command) |
笔者的配置是 QUEUE_CONNECTION=redis ,估以此来分析,其他类型的原理基本类似。
配置的是 redis 时, $queue 是 RedisQueue 实例,下面我们看下 RedisQueue->push() 的内容。
Illuminate/Queue/RedisQueue.php
1 | public function push($job, $data = '', $queue = null) |
至此,我们已经分析完了任务是如何被加入到队列中的。
一致性 Hash 常用于缓解分布式缓存系统扩缩容节点时造成的缓存大量失效的问题。一致性 Hash 与其说是一种 Hash 算法,其实更像是一种负载均衡策略。
GroupCache 是 golang 官方提供的一个分布式缓存库,其中包含了一个简单的一致性 Hash 的实现。其代码在 github.com/golang/groupcache/consistenthash。本文将会基于 GroupCache 的一致性 Hash 实现,深入剖析一致性 Hash 的原理。
本文会着重探讨以下几点内容:
我们先看下传统的 Hash 式负载均衡,当集群扩缩容时会遇到哪些问题。
假设我们有三台缓存服务器,每台服务器用于缓存一部分用户的信息。最常见的 Hash 式负载均衡做法是:对于指定用户,我们可以对其用户名或者其他唯一信息计算 hash 值,然后将该 hash 值对 3 取余,得到该用户对应的缓存服务器。如下图所示:
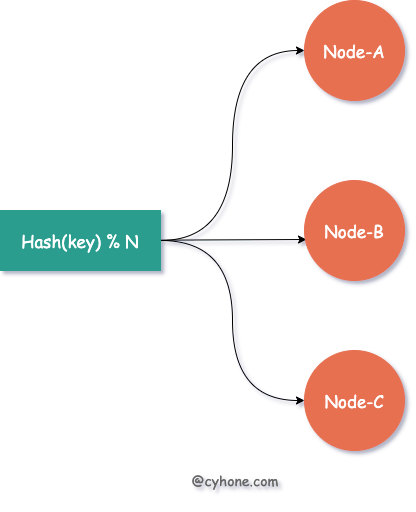
而当我们需要对集群进行扩容或者缩容时,增加或者减少部分服务器节点,将会带来大面积的缓存失效。
例如需要扩容一台服务器,即由 3 台缓存服务器增加为 4 台,那么之前 hash(username) % 3 这种策略,将变更为 hash(username) % 4。整个负载均衡的策略发生了彻底的变化,对于任何一个用户都会面临Hash失效的风险。
而一旦缓存集体失效,所有请求无法命中缓存,直接打到后端服务上,系统很有可能发生崩溃。
针对以上问题,如果使用一致性 Hash 作为缓存系统的负载均衡策略,可以有效缓解集群扩缩容带来的缓存失效问题。
相比于直接对 hash 取模得到目标 Server 的做法,一致性 Hash 采用 有序 Hash 环 的方式选择目标缓存 Server。如下图所示:
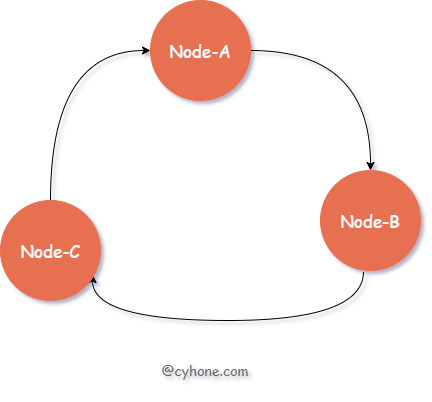
对于该有序 Hash 环,环中的每个节点对应于一台缓存 Server,同时每个节点也包含一个整数值。各节点按照该整数值从小到大依次排列。
对于指定用户来说,我们依然首先出计算用户名的 hash 值。接着,在 Hash 环中按照值大小顺序,从小到大依次寻找,找到 第一个大于等于该 hash 值的节点,将其作为目标缓存 Server。
例如,我们 hash 环中的三个节点 Node-A、Node-B、Node-C 的值依次为 3、7、13。假设对于某个用户来说,我们计算得到其用户名的 hash 值为 9,环中第一个大于 9 的节点为 Node-C,则选用 Node-C 作为该用户的缓存 Server。
以上就是正常情况下一致性 Hash 的使用,接下来我们看下,一致性 Hash 是如何应对集群的扩缩容的。
当我们对集群进行扩容,新增一个节点 New-Node, 假设该节点的值为 11。那么新的有序 Hash 环如下图所示:
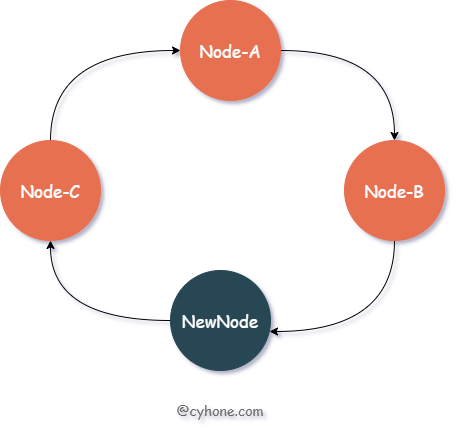
我们看下此时的缓存失效情况:在这种情况下, 只会造成 hash 值范围在 Node-B 和 NewNode 之间(即(7, 11])的数据缓存失效。这部分数据原本分配到节点 Node-C(值为 13),现在都需要迁移到新节点 NewNode 上。
而原本分配到 Node-A、Node-B 两个节点上的缓存数据,不会受到任何影响。之前值范围在 NewNode 和 Node-B 之间(即(11, 13])的数据,被分配到了 Node-C 上面。新节点出现后,这部分数据依然属于 Node-C,也不会受到任何影响。
一致性 Hash 利用有序 Hash 环,巧妙的缓解了集群扩缩容造成的缓存失效问题。注意,这里说的是 “缓解”,缓存失效问题无法完全避免,但是可以将其影响降到最低。
这里有个小问题是,因为有序 Hash 环需要其中每个节点有持有一个整数值,那这个整数值如何得到呢?一般做法是,我们可以利用该节点的特有信息计算其 Hash 值得到, 例如 hash(ip:port)。
以上介绍了一致性 hash 的基本过程,这么看来,一致性 hash 作为缓解缓存失效的手段,的确是行之有效的。
但我们考虑一个极限情况,假设整个集群就两个缓存节点: Node-A 和 Node-B。则 Node-B 中将存放 Hash 值范围在 (Node-A, Node-B] 之间的数据。而 Node-A 将承担两部分的数据: hash < Node-A 和 hash > Node-B。
从这个值范围,我们可以轻易的看出,Node-A 的值空间实际上远大于 Node-B。当数据量较大时,Node-A 承担的数据也将远超于 Node-B。实际上,当节点过少时,很容易出现分配给某个节点的数据远大于其他节点。这种现象我们往往称之为 “数据倾斜”。
对于此类问题,我们可以引入虚拟节点的概念,或者说是副本节点。每个真实的缓存 Server 在 Hash 环上都对应多个虚拟节点。如下图所示: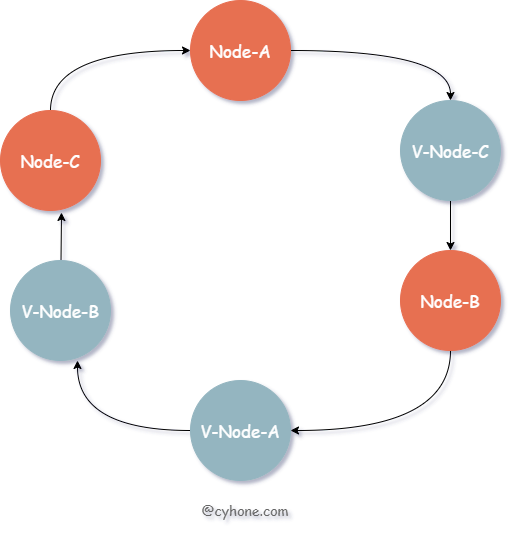
对于上图来说,我们其实依然只有三个缓存 Server。但是每个 Server 都有一个副本,例如 V-Node-A 和 Node-A 都对应同一个缓存 Server。
GroupCache 提供了一个简单的一致性 hash 的实现。其代码在 github.com/golang/groupcache/consistenthash。
我们先看下它的使用方法:
1 | import ( |
consistenthash 对外提供了三个函数:
New(replicas int, fn Hash):构造一个 consistenthash 对象,replicas 代表每个节点的虚拟节点个数,例如 replicas 等于 3,代表每个节点在 Hash 环上都对应有三个虚拟节点。fn 代表自定义的 hash 函数,传 nil 则将会使用默认的 hash 函数。Add 函数:向 Hash 环上添加节点。Get 函数:传入一个 key,得到其被分配到的节点。我们先看下其 Add 函数的实现。Add 函数用于向 Hash 环上添加节点。其源码如下:
1 | func (m *Map) Add(keys ...string) { |
在 Add 函数里面涉及两个重要的属性:
[]int。这个其实就是我们上面说的有序 Hash 环,这里用了一个数组表示。数组中的每一项都代表一个虚拟节点以及它的值。map[int]string。这个就是虚拟节点到用户传的真实节点的映射。map 的 key 就是 keys 属性的元素。在这个函数里面有生成虚拟节点的操作。例如用户传了真实节点为 ["Node-A", "Node-B"], 同时 replicas 等于 2。则 Node-A 会对应 Hash 环上两个虚拟节点:0Node-A,1Node-A,这两个节点对应的值也是直接进行对其计算 hash 得到。
需要注意的是,每次 Add 时候,函数最后会对 keys 进行排序。因此最好一次把所有的节点都加进来,以避免多次排序。
接下来我们分析下 Get 函数的使用,Get 函数用于给指定 key 分配对应节点。其源码如下:
1 | func (m *Map) Get(key string) string { |
首先计算用户传的 key 的 hash 值,然后利用 sort.Search 在 keys 中二分查找,得到数组中满足情况的最小值。因为 keys 是有序数组, 所以使用二分查找可以加快查询速度。
如果没有找到则使用首元素,这个就是环形数组的基本操作了。最后利用 hashMap[keys[idx]], 由虚拟节点,得到其真实的节点。
以上就是 Groupcache 对一致性 Hash 的实现了。这个实现简单有效,可以帮助我们快速理解一致性 Hash 的原理。
sync.Cond 条件变量是 Golang 标准库 sync 包中的一个常用类。sync.Cond 往往被用在一个或一组 goroutine 等待某个条件成立后唤醒这样的场景,例如常见的生产者消费者场景。
本文将基于 go-1.13 的源码 分析 sync.Cond 源码,将会涉及以下知识点:
在正式讲 sync.Cond 的原理之前,我们先看下 sync.Cond 是如何使用的。这里我给出了一个非常简单的单生产者多消费者的例子,代码如下:
1 | var mutex = sync.Mutex{} |
在以上代码中,有一个 producer 的 goroutine 将数据写入到 queue 中,有两个 consumer 的 goroutine 负责从队列中消费数据。而 producer 和 consumer 对 queue 的读写操作都由 sync.Mutex 进行并发安全的保护。
其中 consumer 因为需要等待 queue 不为空时才能进行消费,因此 consumer 对于 queue 不为空这一条件的等待和唤醒,就用到了 sync.Cond。
我们看下 sync.Cond 接口的用法:
sync.NewCond(l Locker): 新建一个 sync.Cond 变量。注意该函数需要一个 Locker 作为必填参数,这是因为在 cond.Wait() 中底层会涉及到 Locker 的锁操作。cond.Wait(): 等待被唤醒。唤醒期间会解锁并切走 goroutine。cond.Signal(): 只唤醒一个最先 Wait 的 goroutine。对应的另外一个唤醒函数是 Broadcast,区别是 Signal 一次只会唤醒一个 goroutine,而 Broadcast 会将全部 Wait 的 goroutine 都唤醒。接下来,我们将分析下 sync.Cond 底层是如何实现这些操作的。
sync.Cond 的 struct 定义如下:
1 | type Cond struct { |
其中最核心的就是 notifyList 这个数据结构, 其源码在 runtime/sema.go#L446:
1 | type notifyList struct { |
以上代码中,notifyList 包含两类属性:
wait 和 notify。这两个都是ticket值,每次调 Wait 时,ticket 都会递增,作为 goroutine 本次 Wait 的唯一标识,便于下次恢复。 wait 表示下次 sync.Cond Wait 的 ticket 值,notify 表示下次要唤醒的 goroutine 的 ticket 的值。这两个值都只增不减的。利用 wait 和 notify 可以实现 goroutine FIFO式的唤醒,具体见下文。head 和 tail。等待在这个 sync.Cond 上的 goroutine 链表,如下图所示: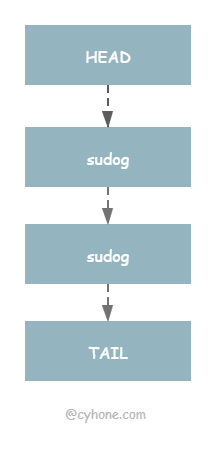
我们先分析下当调用 sync.Cond 的 Wait 函数时,底层做了哪些事情。代码如下:
1 | func (c *Cond) Wait() { |
Wait 函数虽然短短几行代码,但里面蕴含了很多重要的逻辑。整个逻辑可以拆分为 4 步:
第一步:调用 runtime_notifyListAdd 获取 ticket。ticket 是一次 Wait 操作的唯一标识,可以用来防止重复唤醒以及保证 FIFO 式的唤醒。
它的生成也非常简单,其实就是对 notifyList 的 wait 属性进行原子自增。其实现如下:
1 | func notifyListAdd(l *notifyList) uint32 { |
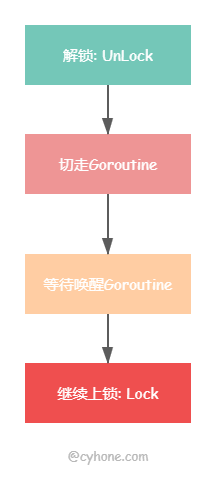
第二步:c.L.Unlock() 先把用户传进来的 locker 解锁。因为在 runtime_notifyListWait 中会调用 gopark 切走 goroutine。因此在切走之前,必须先把 Locker 解锁了。要不然其他 goroutine 获取不到这个锁,将会造成死锁问题。
第三步:runtime_notifyListWait 将当前 goroutine 加入到 notifyList 里面,然后切走goroutine。下面是 notifyListWait 精简后的代码:
1 | func notifyListWait(l *notifyList, t uint32) { |
从以上代码可以看出,notifyListWait 的逻辑并不复杂,主要将当前 goroutine 追加到 notifyList 链表最后以及调用 gopark 切走 goroutine。
第四步:goroutine 被唤醒。如果其他 goroutine 调用了 Signal 或者 Broadcast 唤醒了该 goroutine。那么将进入到最后一步:c.L.Lock()。此时将会重新把用户传的 Locker 上锁。
以上就是 sync.Cond 的 Wait 过程,可以简单用下图表示:
正如最开始的例子中展示的,在 producer 的 goroutine 里面调用 Signal 函数将会唤醒正在 Wait 的 goroutine。而且这里需要注意的是,Signal 只会唤醒一个 goroutine,且该 goroutine 是最早 Wait 的。
我们接下来看下,Signal 是如何唤醒 goroutine 以及如何实现 FIFO 式的唤醒。
代码如下:
1 | func (c *Cond) Signal() { |
我们上面讲 Wait 实现的时候讲到,每次 Wait 的时候,都会同时生成一个 ticket,这个 ticket 作为此次 Wait 的唯一标识。ticket 是由 notifyList.wait 原子递增而来,因此 notifyList.wait 也同时代表当前最大的 ticket。
那么,每次唤醒的时候,也会对应一个 notify 属性。例如当前 notify 属性等于 1,则去逐个检查 notifyList 链表中 元素,找到 ticket 等于 1 的 goroutine 并唤醒,同时将 notify 属性进行原子递增。
那么问题来了,我们知道 sync.Cond 的底层 notifyList 是一个链表结构,我们为何不直接取链表最头部唤醒呢?为什么会有一个 ticket 机制?
这是因为 notifyList 会有乱序的可能。从我们上面 Wait 的过程可以看出,获取 ticket 和加入 notifyList,是两个独立的行为,中间会把锁释放掉。而当多个 goroutine 同时进行时,中间会产生进行并发操作,那么有可能后获取 ticket 的 goroutine,先插入到 notifyList 里面, 这就会造成 notifyList 轻微的乱序。Golang 的官方解释如下:
Because g’s queue separately from taking numbers, there may be minor reorderings in the list.
因此,这种 逐个匹配 ticket 的方式 ,即使在 notifyList 乱序的情况下,也能取到最先 Wait 的 goroutine。
这里有个问题是,对于这种方法我们需要逐个遍历 notifyList, 理论上来说,这是个 O(n) 的线性时间复杂度。Golang 也对这里做了解释:其实大部分场景下只用比较一两次之后就会很快停止,因此不用太担心性能问题。
sync.Cond 在使用时还是有一些需要注意的地方,否则使用不当将造成代码错误。
panic("sync.Cond is copied")错误panic("sync: unlock of unlocked mutex") 错误。代码如下:1 | c.L.Lock() |
这篇是正式阅读的第一篇,从最简单的path开始阅读,我记得之前在掘金收藏过node源码阅读的文章,想找来看看它们的写作思路,发现早就已经取消收藏了(大概是因为质量不高)。不过这样也好,不受到其他人思路的干扰,我的文章输出我自己的阅读收获,先尽量保持清晰。
这个系列我希望能做到格式统一,第一部分先过一下API。我觉得这样做很有必要,对于不熟悉的功能可以先熟悉用法,对于熟悉的功能也可以做一个知识梳理,知道怎么用才能有机会去理解为什么这样用。
path是node中非常常用的一个模块,用来处理各种文件路径相关操作,path的API可以根据所在平台不同展现对应的行为,屏蔽了win和*nix系统之间差异。
path常见API及功能如下:
具体的功能链接里面都有,下面分析源码时候会逐个讲解,这部分就不再重复。
path源码的最后一行如下,导出的内容就是我们require时引入的内容,这里利用process模块识别当前操作系统是否为win32,根据操作系统导出不同内容。process也是node提供的一个模块,内部肯定是要调用原生API来处理,后面还会读到这里,所以在此不作具体分析。
win32很熟悉,就是windows环境。posix是一种线程标准(详见wiki),最早为unix系统使用,后来unix-like系统也开始遵守此标准,现在Windows其实也有兼容,但是通常还是用来作为 nix 系统的代指,个人理解这里可以理解为 nix 系统。具体二者之间的平台差异会在具体API下对比分析。
1 | module.exports = process.platform === 'win32' ? win32 : posix; |
之后来看win32和posix两个对象,其实很简单,里面只有一些属性和方法,这些就是暴露出的path相关API,我们可以在程序中使用path加点调用的,上面已经对其进行了一一列举,下面就依次逐个分析。(因为文档上的排列顺序是按照字母表的,这里为了对应沿用下来,具体在源码中的位置可以搜索查看)
这个方法用于获取path的最后一部分,类似于Unix的basename命令,第二个参数为扩展名,如果传入会返回去除扩展名之后的结果。直接引用官方示例:
1 | path.basename('/foo/bar/baz/asdf/quux.html'); // 返回: 'quux.html' |
实现方式其实两端差异并不是很大,先看posix平台下的逻辑,最后再来看差异的部分。
这个方法的逻辑想想也知道,匹配出最后一个分隔符(posix平台为/符号),截取后面的内容,如果传入了扩展名再截下扩展名部分,返回最终结果。
进入方法首先通过validateString校验参数,如果传入的不是string会抛出错误。之后这里首先处理有扩展名的情况(扩展名长度要小于路径长度,否则视为无效,按照无扩展处理),这里从后向前遍历path,通过charCodeAt获取code,判断是否为分隔符(posix平台为/符号),最终截取首次匹配到分隔符的位置的下一个位置开始,到扩展名前一个位置结束的内容,即为返回结果。对于没传入扩展名的情况,只要截取到结尾位置即可。
对于Windows系统这里有两处不同,首先是盘符判断,Windows系统可以有多个磁盘分区,对于从根目录开始的情况,路径前面会携带盘符信息如C:,这种情况需要排除前两个字符,从第三个字符开始处理。另外,Windows的分隔符为/或\两种都可以,所以这里需要判断两种情况,在源码中的isPathSeparator方法处理了win32的两种分隔符。
特别的,在js等很多编程语言里,
\为转义字符,所以想表示\字符本身需要写作\\。
这是一个常量,返回对应操作系统的路径定界符,路径定界符就是指并列写多个路径时候用来分隔的符号,一个常见的场景就是配置环境变量时候,对于多个值中间的分隔,Windows上为;,而在posix上则是:。在源码中也就是两个导出的属性值常量。
在程序中,我们可以这样使用:
1 | // posix |
这个方法用于获取path的目录名,类似于Unix的dirname命令,示例:
1 | path.dirname('/foo/bar/baz/asdf/quux'); // 返回: '/foo/bar/baz/asdf' |
这个方法在win32和posix上的实现方式有很大区别,首先来看比较简单的posix平台。
posix平台下的实现很简单,依旧是从后向前遍历,找到第一个分隔符截取前面内容即可,特别的,对于没匹配到的情况,绝对路径返回/相对路径返回.。
在win32平台下核心处理逻辑和posix是相同的,但是关于开头的盘符相关处理有一段特有的逻辑,通过多次遍历处理最终截取正确的dirname。
返回扩展名,包括.符号,这里就是一个字符串匹配,找到最后一次出现.的位置截取后面内容,如果.出现在文件首部则返回空。
1 | path.extname('index.html'); // 返回: '.html' |
具体的匹配思路也没有什么特别之处,依旧是从后向前遍历,win32下需要处理首部的盘符信息。
判断是否为绝对路径,在posix上很简单,判断是否以/开头即可,win32上复杂一些,以盘符开头的也符合绝对路径条件。
1 | // posix |
返回path方法中的posix部分。在源码的结尾处有这样两行:
1 | posix.win32 = win32.win32 = win32; |
这里在导出的内容上都挂载了win32和posix两个对象的引用,无论在什么平台上,都可以通过path获取想要的对象,通过这个对象可以访问对应平台下的属性和方法。
一个常量,系统分隔符属性,在win32返回\,在posix返回/ ,实际上win32两种都支持,这里只返回\,同样由于转义字符的原因,源码里为\\。常见用法:
1 | // posix |
这个方法只在win32生效,posix环境是一个空方法,直接返回path。关于namespace相关的内容参见这个链接,相关的东西我没使用过,源码也只是根据格式对path做了匹配。
见path.posix。
这是第一篇node源码解读文章,写的是最简单的path模块,但是真正开始写起来,要比想象的困难很多,可能也是很长时间没写作的原因吧,完成最简单的一篇用了好多天,后面我可能会适当调整方法了。
从这一篇起要开始阅读node.js的源码了,node的源码在github上,直接clone即可,主要由JavaScript和C++编写。
不论是学习哪些开源的东西,源码学习永远是其中不可缺少的一部分,所有人都会告诉你一定要看源码。不过为什么要看源码,怎样去看源码,这些问题大家的答案就不同了,当然这些并不重要,我个人主要是出于一下几个原因吧。
阅读源码要带着目的去读,而我的目的是要从源码中学习优秀的编码方式,因此至少在第一次阅读的时候,我不回去从node的启动流程整体去分析源码,更不会去自己编译一版node。这次阅读的重点是node源码中js编写的部分,首先从API相关源码入手,会涉及到一些架构相关源码,逐层深入零散的理解源码,最终输出的产物就是每一部分API源码实现技巧以及get到的相关知识,包括不限于网络、操作系统等。首次阅读结束后,整理一下node启动流程,阅读一下C++相关源码,本地编译出node环境进行更深入的学习。过程其实不会很短,希望有所收获。
其实写这篇的时候我已经阅读了几个file了,和自己想象的还是有很大不同的,有些模块的操作基本不依赖C++端,但大部分都或多或少的有依赖,这会涉及到C++模块与JavaScript之间的链接和交互,这些部分我目前还不是很了解,需要随着阅读同时学习,这可能会使得进度变慢,但是对后续学习还是会有促进作用。开头会很难,希望能坚持下去。
下一篇是正式阅读的第一篇,就从最简单的模块path开始。